JavaScript
Learning Area & Coding Reference
Coded and Created by Dylan R Hewitt
Console
The console is panel that display important messages, like errors, for developers. Much of the work the computer does with our code is invisible to use by default. If we want to see things appear on our screen, we can print, or log, to our console directly.
In JavaScript, the console keyword refers to an object, a collection of data and actions, that we can use in our code. Keywords are words that are built into the JavaScript language, so the computer will recognize them and treats them specially.
Comments
Programming if often highly collaborative. In additon, our own code can quickly become difficult to understand when we return to it, sometimes only an hour later! For these reasons, it's often useful to leave notes in our code for other developers or ourselves.
1. Single line comments will comment out a single line and is denoted with two forward slashes // preceding it.
2. Multi-line comment will comment out multiple lines and is enoted with /* to begin the comment, and */ to the end the comment.
This is a multi-line comment
/*
Data Types
Data types are the classifications we give to the different kinds of data that we use in programming. In JavaScript, there are seven fundmental data types.
- Number: Any number, including numbers with decimals: 4,8,1516,23,42.
- String: Any grouping of characters on your keyboard(letters, numbers, spaces, symbols, etc.) surrounded by single quotes: '...' or double quotes "...". Though we prefer single quotes. Some people like to think of string as a fancy word for text.
- Boolean: This data type only has two possible values either true or false(without quotes). It's helpful to think of booleans as on and off switches or as the answers to a "yes" or "no" question.
- Null: This data type is denoted by the keyword undefined (without quotes). It also represents the absence of a value though it has a different use than null.
- Symbol: A newer feature to the language, symbols are unique identifers, useful in more complex coding. No need to worry about these for now.
- Object: Collections of related data.
Arithmetic Operators
Basic arithmetic often comes in handy when programming.An operator is a character that performs a task in our code. JavaScript has several built-in arithmetic operators, that allow us to perform mathematical calculations on numbers. These include the following operators and their corresponding symbols:
- Add: +
- Subtract: -
- Multiply: *
- Divide: /
- Remainder: %
String Concatenation
Operators aren't just for numbers. When a + operator is used on two strings, it appends the right string to the left string.
The process of appending one string to another is is called concatenation. Notice in the thrid example we had to make sure to include a space at the end of the first string. The computer will join the strings exactly, so we needed to make sure to include the space we wanted between the two strings.
Properties
When you introduce a new piece of data into a JavaScript program, the browser saves it as an instance of the data type.Every string instance has a property called length that stores the number of characters in that string. You can retrieve property information by appending the string with a period and the property name:
Methods
Remember that methods are actions we can perform. JavaScript provides a number of strings methods. We can, or use, these methods by appending an instance with:
- a period(the dot operator)
- the name of the method
- opening and closing parentheses
Built-in Objects
In addition to console, there are other objects built into JavaScript. Like the Math Object. The great thing about objects is that they have methods.
Variables
In programming, a variable is a container for a value. You can think of variables as little containers for information that live in a computer’s memory. Information stored in variables, such as a username, account number, or even personalized greeting can then be found in memory. Variables also provide a way of labeling data with a descriptive name, so our programs can be understood more clearly by the reader and ourselves. In short, variables label and store data in memory. There are only a few things you can do with variables:
- 1. Create a variable with a descriptive name.
- 2. Store or update information stored in a variable.
- 3. Reference or "get" information stored in a variable.
It is important to distinguish that variables are not values; they contain values and represent them with a name. Observe the diagram with the colored boxes. Each box represents variables; the values are represented by the content, and the name is represented with the label. In this lesson, we will cover how to use the var, let, and const keywords to create variables.
Create a Variable: let
As mentioned in the previous exercise, the let keyword was introduced in ES6. The let keyword signals that the variable can be reassigned a different value.
Create a Variable: const
The constkeyword was also introduced in ES6, and is short for the word constant. Just like with var and let you can store any value in a const variable. The way you declare a const variable and assign a value to it follows the same strucutre as let and var. Take a look at the following example:
However, a const variable cannot be reassigned becuase it is constant. If you try to reassign a const variable, you'll get a TypeError. Constants variables must be assigned a value when declared. If you try to declare a const variable without a value, you'll get a Syntax Error. .
Mathematical Assignment Operators
Let's consider how we can use variables and math operators to calculate new values and assign them to variables. Check out the examples below.
Another way we could have reassigned w after performing some mathematical operation on it is to use built-in mathematical assignment operators. We could re-write the code above to be:
In the second example, we used the += assigment operator to reassign w. We're performing the mathematical operation of the first operator + using the number to the right, then reassiging w to the computed value. We also have access to other mathematical assignment operators" -= *= and /= which work in similar fashion.
The Increment and Decrement Operator
Other mathematical assignment operators include the increment operator (++) and decrement operator (--).The increment operator will increase the value of the variable by 1. The decrement operator will decrease the value of the variable by 1. For example:
Just like the previous mathematical assignment operators(+=, -=, *=, /=), the variable's value is updated and assigned as the new value of that variable.
String Concatenation with Variables
In previous exercises, we assigned strings to variables. Now, let’s go over how to connect, or concatenate, strings in variables. The + operator can be used to combine two string values even if those values are being stored in variables:
String Interpolation
In the ES6 version of JavaScript, we can insert, or interpolate, variables into strings using template literals. Check out the following example where a template literal is used to log strings together:
typeof operator
While writing code, it can be useful to keep track of the data types of the variables in your program. If you need to check the data type of a variable’s value, you can use the typeof operator. The typeof operator checks the value to its right and returns, or passes back, a string of the data type.
Conditonal Statements
Covering the following concepts:
- if,else if, and else statements
- comparison operators
- logical operators
- truthy vs falsy values
- ternary operators
- switch statements
If statement
If...Else Statements
Comparison Operators
When writing conditional statements. sometimes we need to use different types of operators to campare values. These operators are called comparison operators.
-
Here's a list of some handy comparison operators and their syntax:
- Less Than: << /li>
- Greater Than: >
- Less than or equal to: <=< /li>
- Greater than or equal to: >=
- Is equal to: ===
- Is not equal to: !==
Comparison operators compare the value on the left with the value on the right. For instance:
Logical Operators
Working with conditionals means that we will be using booleans, true or false values. In JavaScript, there are operators that work with boolean values known as logical operators. We can use logical operators to add more sophisticated logic to our consitionals. There are three logical operators:
- the and operator (&&)
- the or operators (||)
- the not operator, otherwise known as the bang operator (!)
When we use the && operator, we are checking that two things are true.
When using the && operator, both conditions must evaluate to true for the entire condition to evaluate to true and execute. Otherwise, if either condition is false, the && condition will evaluate to false and the else block will execute. If we only care about either condition being true, we can use the || operator:
Truthy and Falsy
Let's consider how non-boolean data types, like strings or numbers, are evaluated when checked inside a condition. Sometimes, you'll want to check if a variable exisits and you won't necessarily want it to equal a specific value - you'll only check to see if the variable has been assigned a value.
So which values are falsy - or evaluate to false when checked for a condition?
-
The list of falsy values includes:
- 0
- Empty strings like "" or ''
- null which represent when there is no value at all
- undefined which represent when a declared variable lacks a value
- NaN or Not a Number
Truthy and Falsy Assignment
Truthy and falsy evaluations open a world of short-hand possibilities!
Ternary Operator
In the spirt of using short-hand syntax, we can use a ternary operator to simplify an if else statement.
Else If Statements
We can add more conditions to our if...else with an else if statement. The else if statement allows for more than two possible outcomes. You can add as many else if statements as you’d like, to make more complex conditionals! The else if statement always comes after the if statement and before the else statement. The else if statement also takes a condition. Let’s take a look at the syntax:
The else if statements allow you to have multiple possible outcomes. if/else if/else statements are read from top to bottom, so the first condition that evaluates to true from the top to bottom is the block that gets executed.
The switch keyword
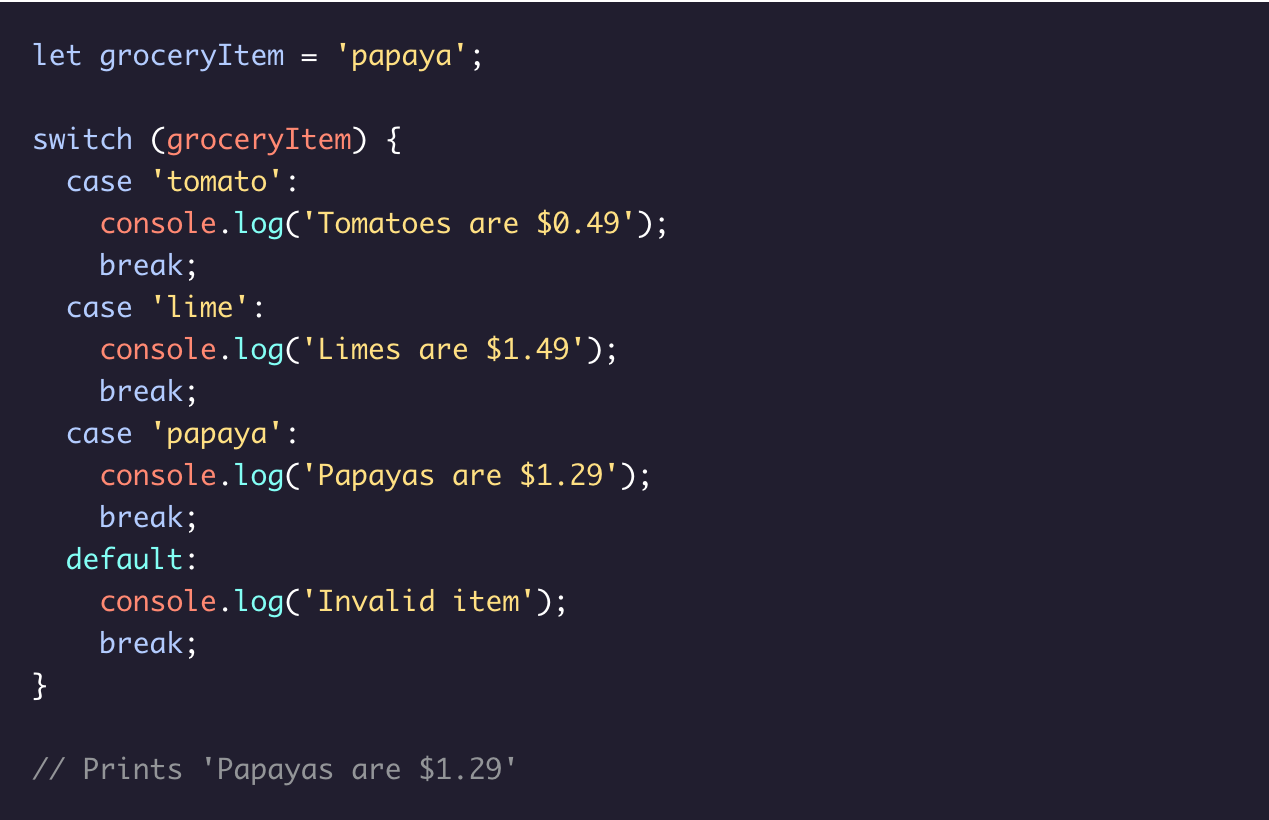
else if statements are a great tool if we need to check multiple conditions. In programming, we often find ourselves needing to check multiple values and handling each of them differently. A switch statement provides an alternative syntax that is easier to read and write. A switch statement looks like this:
Function Declarations
In JavaScript, there are many ways to create a function. One way to create a function is by using a function declaration. Just like how a variable declaration binds a value to a variable name, a function declaration binds a function to a name, or an identifier.
-
A function declaration consists of:
- The function keyword
- The name of the function, or it's identifer, followed bt parentheses.
- A function body, or the block of statements required to perform a specific task, enclosed in the function's curly brackets, {}.
A function declaration is a function that is bound to an identifier, or name. In the next exercise we’ll go over how to run the code inside the function body. We should also be aware of the hoisting feature in JavaScript which allows access to function declarations before they’re defined.

Calling a Function
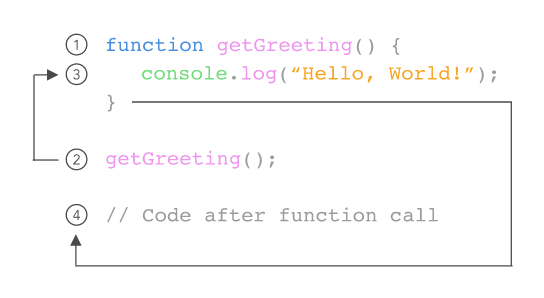
As we saw in previous exercises, a function declaration binds a function to an identifier. However, a function declaration does not ask the code inside the function body to run, it just declares the existence of the function. The code inside a function body runs, or exexutes, only when the function is called.

Parameters & Arguments
So far, the functions we've created execute a task without an input. However, some functions can take inputs and use the inputs to perfom a task. When declaring a function, we can specify its parameters. Parameters allow functions to accept inputs and perfom a taking using the inputs. We use parameters as a placeholders for information that will be passed to the function when it is called.
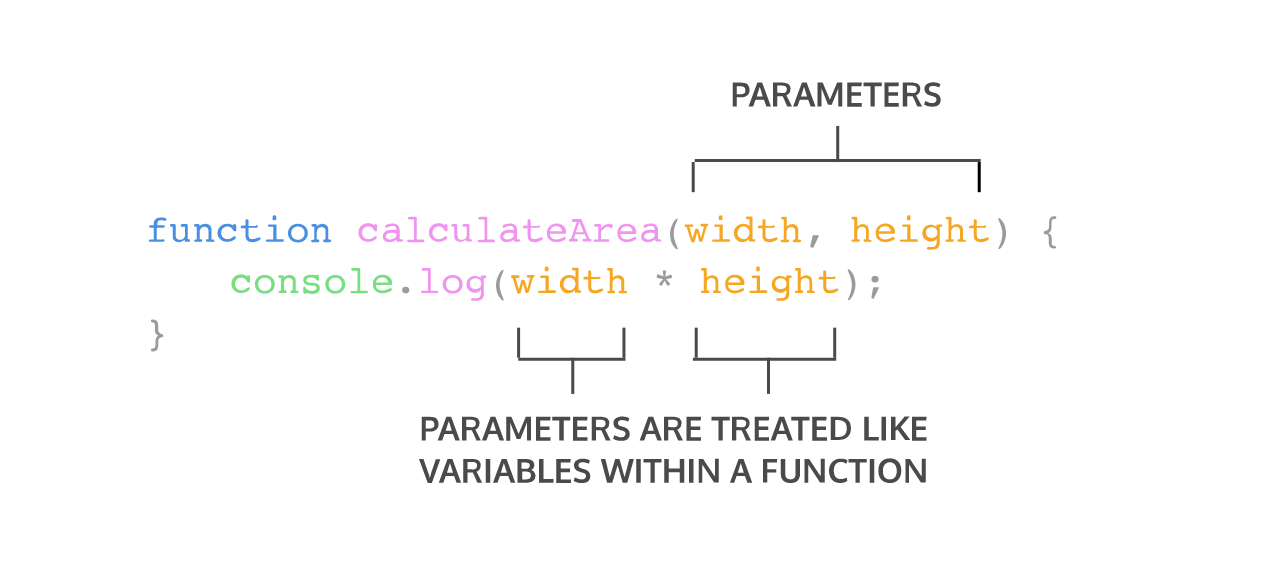
When calling a function that has parameters, we specify the values in the parentheses that follow the function name. The values that are passed to the function when it is called are called arguments. Arguments can be passed to the function as values or variables.
Default Parameters
One of the features added in ES6 is the ability to use default parameters. Default parameters allow parameters to have a predetermined value in case there is no argument passed into the function or if the argument is undefined when called.

Return
When a function is called, the computer will run through the functions code and evaluate the result of calling the function. By default that resulting value is undefined. To pass back information from the function call, we use a return statement. To create a return statement, we use the return keyword followed by the value that we wish to return. Like we saw above, if the value is omitted, undefined is returned instead. When a return statement is used in a function body, the execution of the function is stopped and the code that follows it will not be executed.
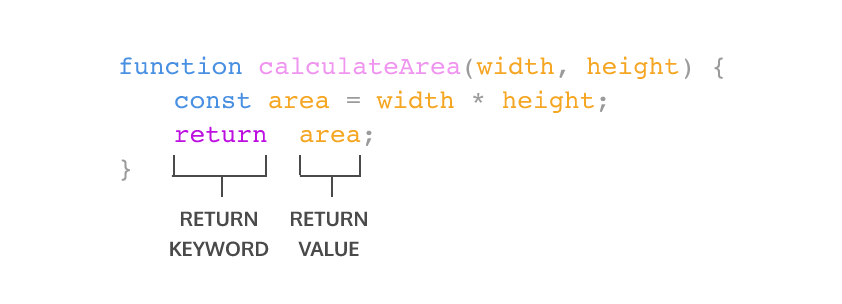
Helper Functions
We can also use the return value of a function inside another fnction. The functions being called within another function are often referred to as helper functions. Since each function is carrying out a specific task, it makes our code easier to read and debug if necessary.
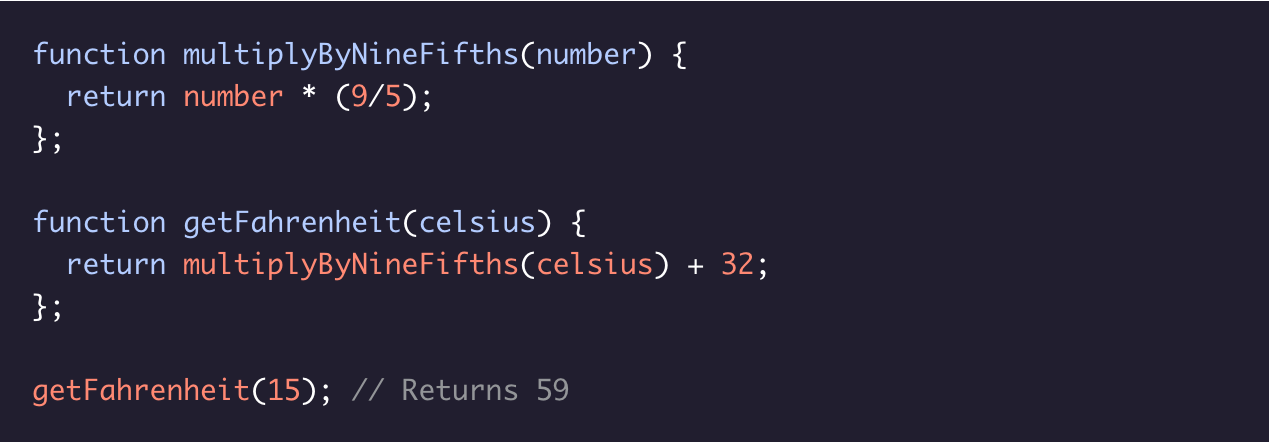
We can use functions to section off small bits of logic or tasks, then use them when we need to. Writing helper functions can help take large and difficult tasks and break them into smaller and more manageable tasks.
Function Expressions
Another way to define a function is to use a function expression. To define function inside an expression, we can use the function keyword. In a function expression, the function name is usually omitted. A function with no name is called an anonymous function. A function expression is often stored in a variable in oreder to refer to it.
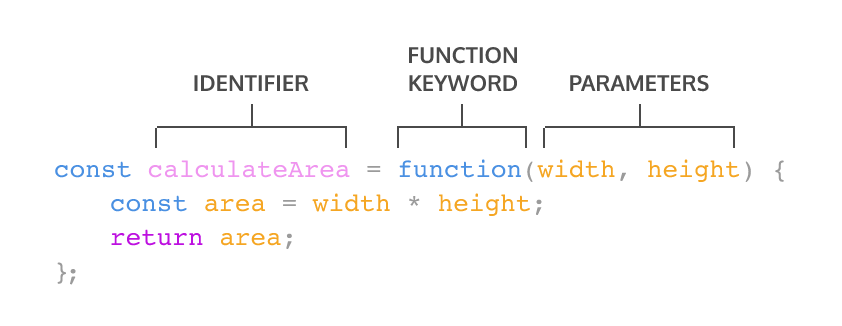
To delcare a function expression:
- 1. Declare a variable to make the variable's name be the name, or identifier, of your function. Since the release of ES6, it is common pracitice to use const as the keyword to declare the variable.
- 2. Assign as that variables value an anonymous function created by using the function keyword followed by a set of parentheses with possible parameters. Then a set of curly braces that contain the function body.
To invoke a function expression, write the name of the variable in which the function is stored followed by parentheses enclosing any arguments being passed into the funciton.
Arrow Functions
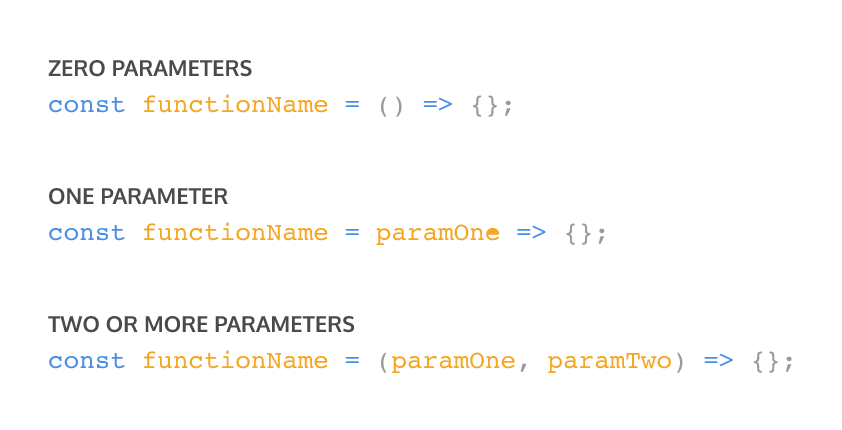
ES6 introduced arrow functions syntax, a shorter way to write functions by using the special "fat arrow" () => notation. Arrow funcitons remove the need to type out the keyword function everytime you need to create a function. Instead, you first include the parameters inside the () and then add an arrow => that points to the function body surrounded in {}.

Concise Body Arrow Functions
JavaScript also provides several ways to refactor arrow functions syntax. The most condensed form of the function is know as concise body. We'll explore a few of the techniques below:
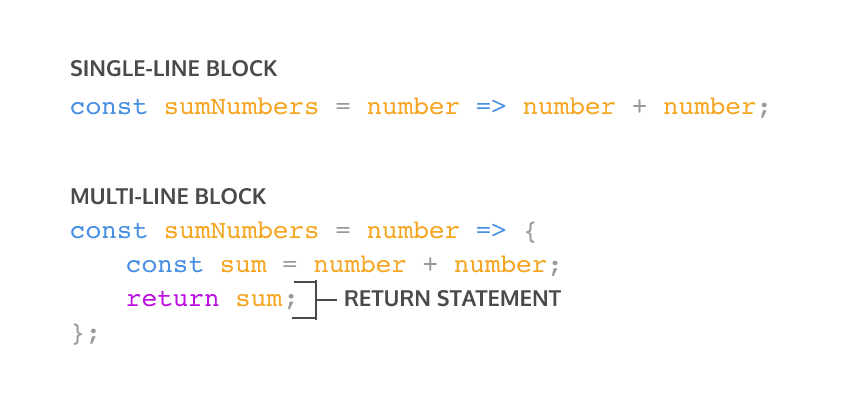
- 1. Function that take only a single parameter do not need that parameter to be enclosed in parentheses. However, if a function takes zero or multiple parameters, parentheses are required.
- 2. A function body composed of a single-line block does not need curly braces. Without the curly braces, whatever that line evaluates will be automatically returned. The contnets of the block should immediately follow the arrow => and the return keyword can be removed. This is referred to as implicit return.
Scope
An imporant idea in programming is scope. Scope defines where variables can be accessed or referenced. While some variables can be accessed from anywhere within a program, other variables may only be available in a specific context.
You can think of scope like the view of the night sky from your window. Everyone who lives on the planet Earth is in the global scope of the stars.The starts are accessibile globally. Meanwhile, if you live in a city, you may see the city skyline or the river. The skyline and river are only accessible locally in your city, but you can still see the stars that are avaiable globally.
Blocks and Scope
Before we talk more about scope, we first need to talk about blocks. We've seen blocks used before in functions and if statements. A block is the code found inside a set of curly braces {}. Blocks help us group one or moer statements together and serve as an important structural marker for our code.

Global Scope
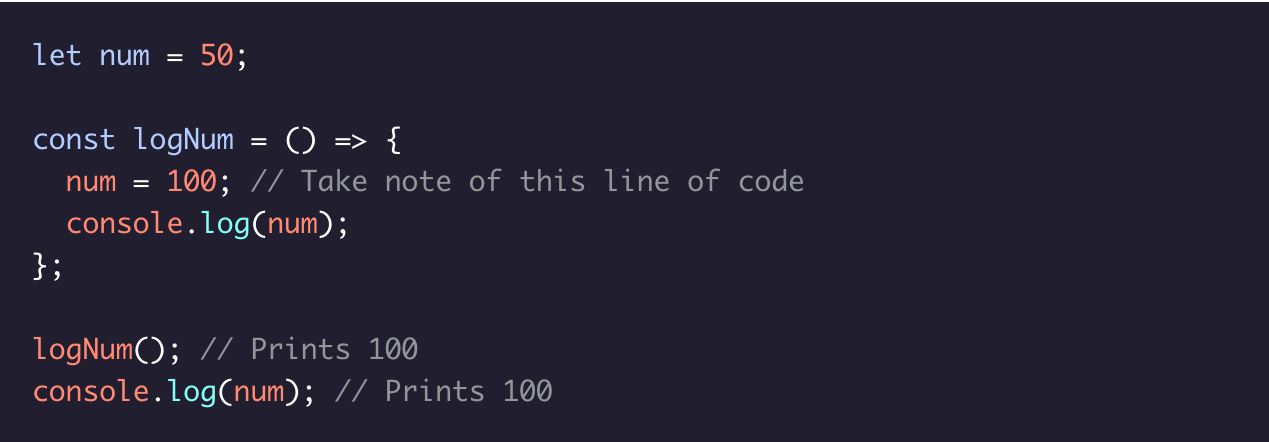
Scope in the context in which our variables are declared. We think about scope in relation to blocks because variables can exist either outside of or within these blocks.
In global scope, variables are declared outside of blocks. These variables are called global variables. Because global variables are not bound inside a block, they can be accessed by any code in the program, including code in blocks. global-scope.png

Block Scope
The next context we'll cover is block scope. When a variable is defined inside a block, it is only accessible to the code within the curly braces {}. We say that variable has block scope because it is only accessible to the lines of code within that block.
Variables that declared with block scope are known as local variables becuase they are only avaiable to the code that is part of the same block.

Scope Pollution
It may seem like a great idea to always make your variables accessible, but having too many variables can cause problems in a prgram.
When you declare global variables, they fo to the global namespace. The global namespace allows the variables to be accessible from anywhere in the program. These variables remain there until the program finishes which means our global namespace can fill up really quickly.
Scope pollution is when we have too many global variables that exist in the global namespace, or when we resuse variables across different scopes. Scope pollution makes it difficult to keep track of our different variables and sets us up for potential accidents. For example,globally sciped variables can collide with other variables that are more locally scoped, causing unexpected behaviour in our code.
Arrays
Organizing and storing data is a foundational concept of programming. One way we organzie data in real life is by making lists. Let write this list in JavaScript, as an array

Arrays are JavaScript's way of making lists. Arrays can store any data types(including strings, numbers, booleans). Like lists, arrays are ordered, meaning each item has a numbered position.
Create an Array
One way we can create an array is to use an array literal. An array literal creates an array by wrapping items in sqaure brackets []. Remember from the previous exercise, arrays can store any data type - we can have an array that holds all the same data types or an array that holds different data types.
Acessing Elements
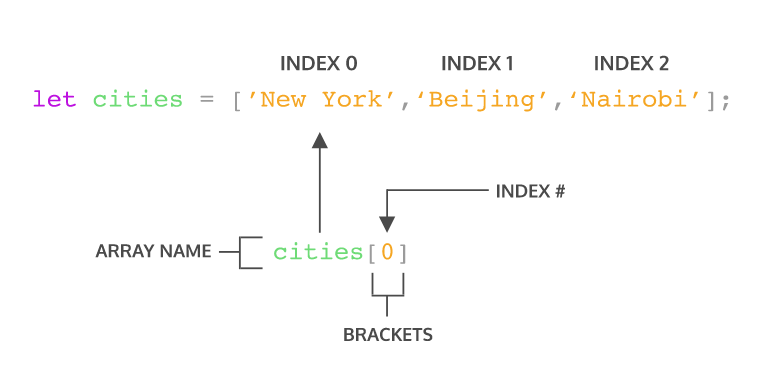
Each element is an array has a numbered position known as it's index. We can access individual items using their index, which is similar to referencing an item in a list based on the item's position.
Arrays in JavaScript are zero-indexed, meaning the positions start counting from 0 rather than 1. Therefore, the first item in an array will be at position 0. Let's see how we could access an elements in an array:
You can also access individual characters in a string using bracket notation and the index. For instance, you can write:

Update Elements
In the previous exercise, you learned how to access elements inside an array or a string by using an index. Once you have access to an element in an array, you can update its value.

Arrays with let and const
You may recall that you can declare variables with both the let and const keywords. Variables declated with let can be reassinged. Variables declared with the const keyword cannot be reassigned.However, elements in an array declated with const remain mutable.Meaning that we can change the contents of a const array, but cannot reassign a new array or a different value.
The instructions below will illustrate this concept more clearly. Pay close attention to the similarities and differences between the condiments array and the utensils array as you complete the steps.
The .length property
One of an array's built-in properties is length and it returns the number of items in the array. We access the .length property just like we do with strings. Check the example below.

The .push() Method
Let's learn about some built-in JavaScript methods that make working with arrays easier. These methods are specifically called on arrays to make common tasks, like adding and removing elements, more straightforward. One method, .push() allows us to add items to the end of an array. Here is an example of how this is used:

The .pop() Method
Another array method, .pop(), removes the last item of an array.

More Array Methods
There are many more array methods than just .push() and .pop(). You can read about all of the array methods that exist on the Mozilla Developer Network(MDN) array documentation.
.pop() and .push() mutate the array on which they're called. However, there are times that we don't want to mutate the original array and we can use non mutating array methods. Be sure to check MDN to understand the behavior of the methods you are using.
Some array methods that are available to JavaScript developers include: .join(), .slice(), .splice(), .shift(), .unshift(), and .concat() amongst many others. Using these built-in methods make it easier to do some common taks when working with arrays.
Arrays and Functions
Throughout the lesson we went over arrays being mutable, or changeable. Well what happens if we try to change an array inside a function? Does the array keep the change after the function call or is it scoped to inside the function?
Take a look at the following example where we call .push() on an array inside a function. Recall, the .push() method mutates, or changes, an array:
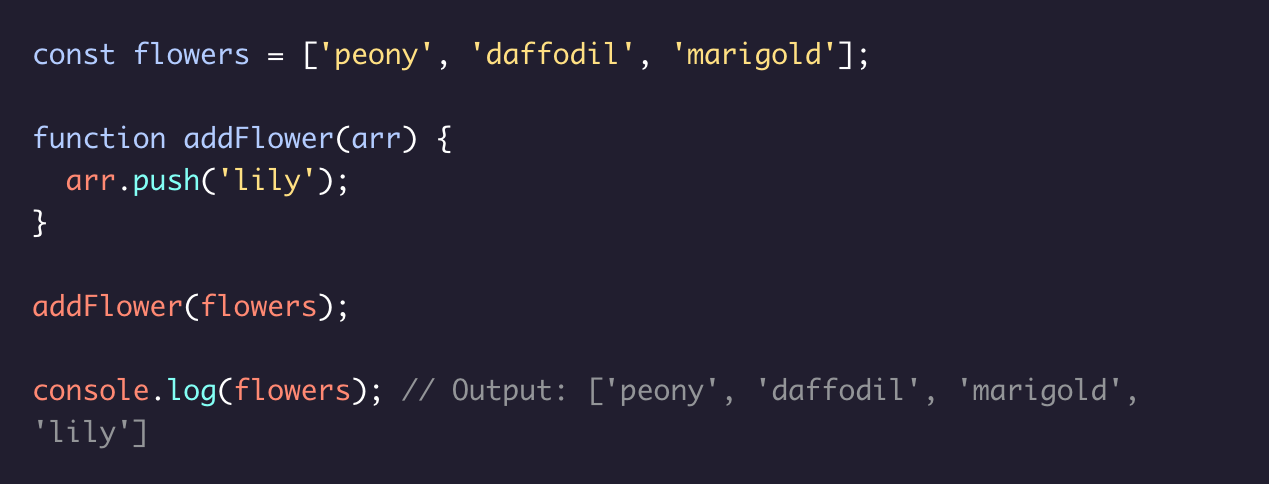
So when you pass an array into a function, if the array is mutated inside the function, that change will be maintained outside the function as well. You might also see this concept explained as pass-by-reference since what we're actually passing the function is a reference to where the variable memory is stored and changing the memory.
Nested Arrays
Earlier we mentioned that arrays can store other arrays. When an array contains another array it is known as a nested array. Examine the example below:

To access the nested arrays we can use bracket notation with the index value, just like we did to access any other element:

Notice that nestedArr[1] will grab the element in index 1 which is the array [2],[3]. Then, if we wanted to access the elemements within the nested array we can chain, or add on, more bracket notation with index values.

In the second console.log() statement, we have two bracket notations chained to nestedArr. We know that nestedArr[1] is the array [2,3]. Then to grab the first element from that array, we use nestedArr[1][0] and we get the value 2.
Loops
A loop is a programming tool that repeats a set of instructions until a specified condition, called a stopping conditon is reached. As a programmer, you'll find that you rely on loops all the time! You'll hear the generic term iterate when referring to loops, iterate simply means "to repeat".
When we need to reuse a task in our code, we often bundle that action in a function. Similarly, when we see that a process has to repeat multiple times in a row, we write a loop. Loops allow us to create efficient code that automates processes to make scalable, manageable programs.
Loops iterate or repeat an action until a specific condition is met. When the condition is met, the loop stops and the computer moves on to the next part of the program.
The For Loop
Instead of writing out the same code over and over, loops allow us to tell computers to repeat a given block of code on its own. One way to give computers these instructions is with a for loop.
The typical for loop includes an iterator variable that usually apperars in all three expressions. The iterator variable is initialized, checked against the stopping condition, and assigned a new value on each loop iteration. Iterator variables can have any name, but it's best practice to use a descrptive variable name.
A for loop contains three expressions separated by ; inside the parentheses:
- 1. an initialization starts the loop and can also be used to declare the iterator variable.
- 2. a stopping condition is the condition that the iterator variable is evaluated against-if the condition evaluates to true the code block will run, and if it evaluates to false the code will stop.
- 3. an iteration statement is used to update the iterator variable on each loop:

Looping in Reverse
What if we want the for loop to log 3,2,1 and then 0. With simple modifications to the expressions, we can make our loop run backward! To run a backward for loop, we must:
- Set the iterator variable to the highest desired value in the initialization expressions
- Set the stopping condition for when the iterator variable is less than the desired amount
- The iterator should decrease in intervals after each iteration.
Looping through Arrays
for loops are very handy for iterating over data structures. For example, we can use a for loop to perform the same operation on each element on an array. Arrays hold lists of data, like customers names or product information. Imagaine we owned a store and wanted to increase the price of every product in our catalog. That could be a lot of repeating code, but by using a for loop to iterate through the array we could accomplish this task easily.
To loop through each element in an array, a for loop should use the arrays.length property in its condition.

Nested Loops
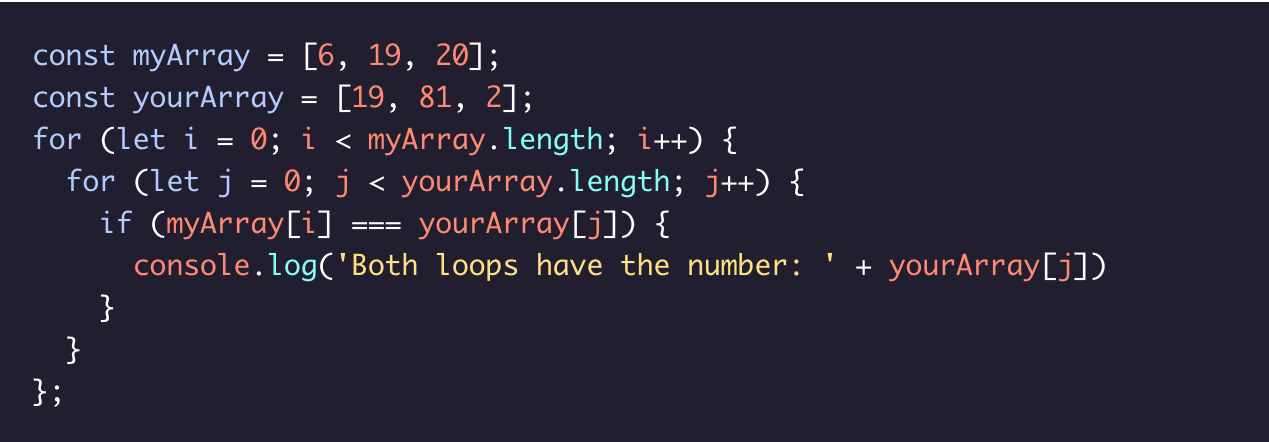
When we have a loop running inside another loop, we call that a nested loop. One use for a nested for loop is to compare the elements in two arrays. For each round of the outer for loop, the inner for loop will run completely. Let's look at an example:
The While Loop
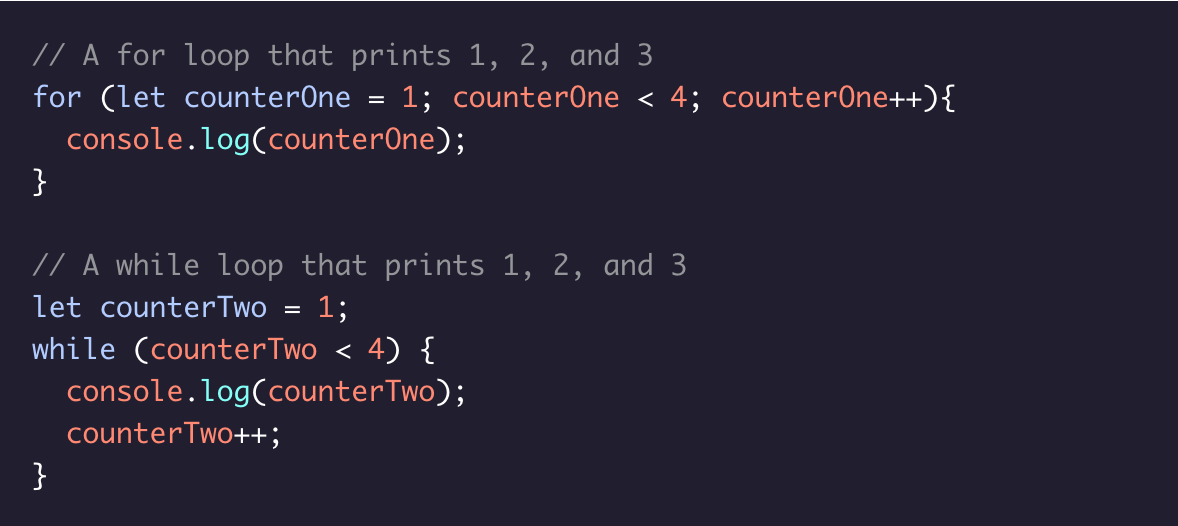
You're doing great! We're going to teach you about a different type of loop: the while loop. To start, let's convert a for loop into a while loop:
Do... While Statements
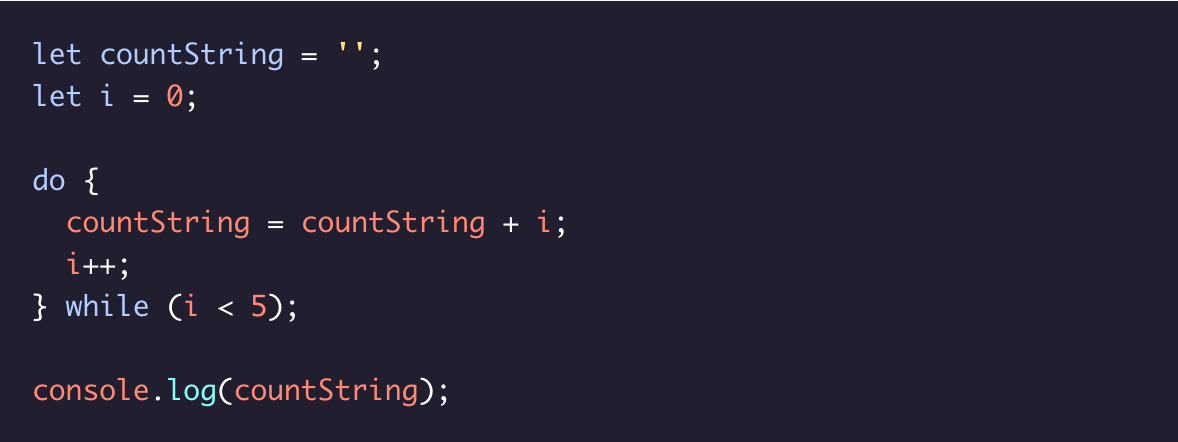
In some cases, you want a piece of code to run at least once and then loop based on a specific condition after its initial run. This is where the do... while statements comes in.
A do...while statement says to do a task once and then keep doing it until a specified condition is no longer met. The syntax for a do...while statement look like this:
The break Keyword
Imagine we're looking to adopt a dog. We plan to go to the shelter every day for a year and then give up. But what if we meet our dream dog on day 65? We don't want to keep going to the shelter for the next 300 days just because our original plan was to go for a whole year. In our code, when we want to stop a loop from continuing to execute even though the original stopping condition we wrote for our loop hasn't been met, we can use the keyword break.
The break keyword allows programs to break out of the loop from within the loops block. Let's check out the syntax of a break keyword.
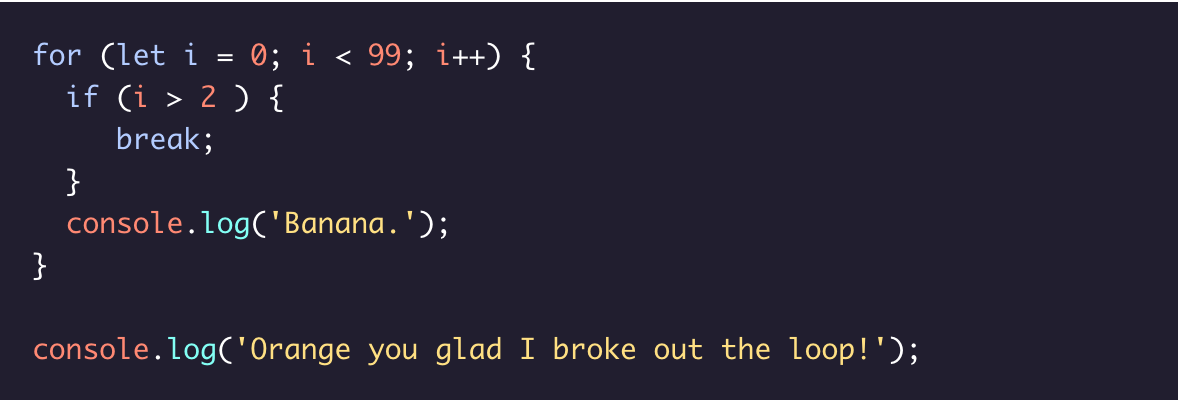
break statements can be especially helpful when we're looping through large data structures. With breaks, we can add test conditions besides the stopping condition, and exit the loop when they're met.
Higher-Order Functions
We are often unaware of the number of assumptions we make when we communicate with other people in our native languages. If we tolf you to count to three, we would expect you to say or think the numbers one, two and three. With programming we're faced with needing to be more explicit with our directions to the computer. Here's how we might tell the computer to count to three.

When we speak to other humans, we share a vocabilary that gives us quick ways to communicate complicated concepts. When we say "bake", it calls to mind a familiar subroutine-preheating an oven, putting something into an oven for a set amount of time, and finally removing it. This allows us to abstact away a lot of the details and communicate key concepts more concisely. Instead of listing all those details, we can say,"We baked a cake", and still impart all that meaning into you.
In programming, we can accompish "abstraction" by writing functions. In addition to allowing us to reuse our code, functions help to make clear, readable programs. If you encountered countToThree() in a program, you might be able to quickly guess what the function did without having to stop and read the functions body.
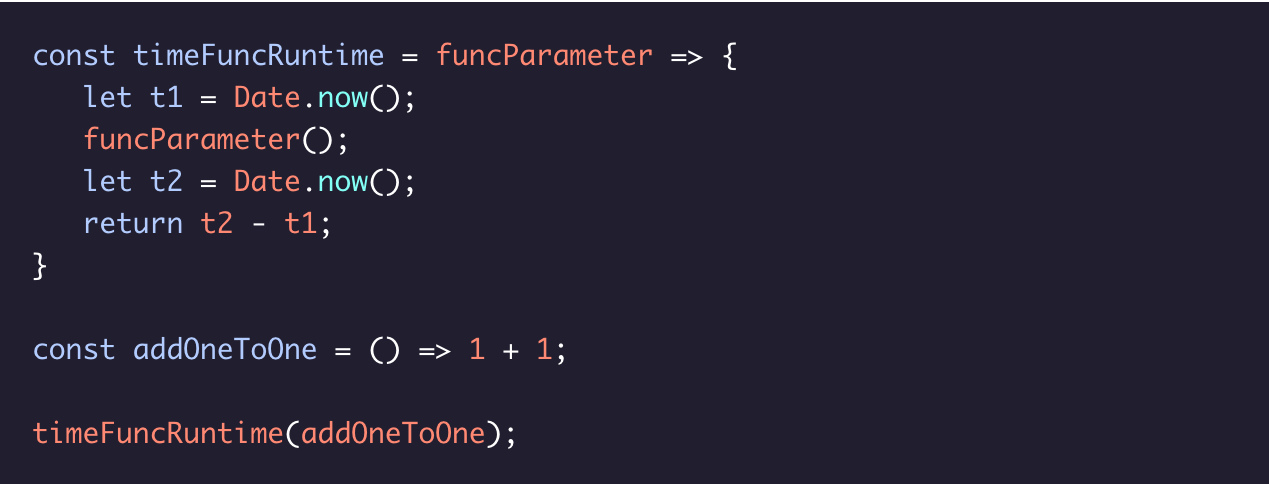
We're also going to learn about another way to add a level of abstraction to our programming: higher-order functions. Higher-order functions are functions that accept other functions as arguments and/or returns functions as output.In summary,using more abstraction in our code allows us to write more modular code which is easier to read and debug.
Functions as Data
JavaScript functions behave like any other data type in the language, we can assign functions to variables, and we can reassign them to new variables.
Below, we have an annoying long function name that hurts the readability of any code in which it's used. Let's pretend this function does important work and needs to be called repeatedly!

What if we wanted to rename this function without sacrificing the source code. We can re-assign the function to variable with a suitably short name.
Functions as Parameters
Since functions can behave like any other type of data in JavaScript, it might not surprise you to learn that we can also pass functions(into other functions)as parameters. A higher-order function is a function that either accepts functions as parameters, returns a function, or both. We call the functions that get passed in as parameters and invoked callback functions becuase they get called during the execution of the higher-order functions.
When we pass a function in as an argument to another function, we don't invoke it. Invoking the function would evaluate to the return value of that funciton call. With callbacks, we pass in the function itself by typing the function name without the parentheses(that would evaluate to the result of calling the function).
Introduction to Iterators
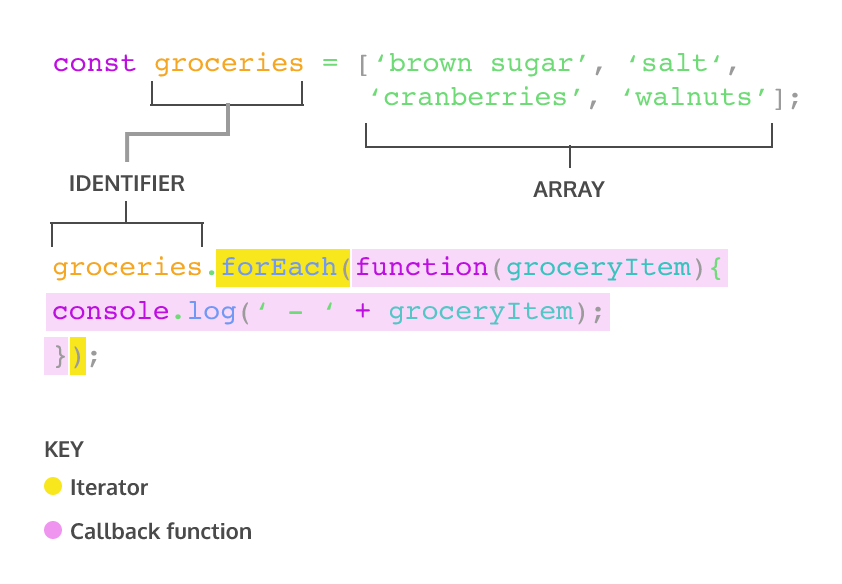
Imagine you had a grocery list and you wanted to know what each item on the list was. You'd have to scan through each row and check for the item. This common task if similar to what we have to do when we want to iterate over, or loop through, an array. One tool at our disposal is the for loop. However, we also have access to built-in array methods which make looping easier.
The built-in JavaScript array methods that help us iterate are called iteration methods, at times refereed to as iterators. Iterators are methods called on arrays to manipulate elements and return values.
- .forEach()
- .map()
- .filter()
The .forEach() Method
The first iteration method that we're going to learn is .forEach(). Aptly named, .forEach() will execute the same code for each element of an array.
The .map() Method
The second iterator we're going to cover is .map(). When .map() is called on an array, it takes an argument of a callback function and returns a new array. Take a look at an example of calling ,map():

.map() works in a similar manner to .forEach() - the major difference is that .map() returns a new array.
The .filter() Method
Another useful iterator method is .filter(). Like .map, .filter() returns a new array. However, .filter() returns an array of elements after filtering out certain elements from the original array. The callback funciton for the .filter() method should return true or false depending on the element that is passed to it. The elements that cause the callback function to return true are added to the new array. Take a look at the following example:

The .findIndex() Method
We sometimes want to find the locaiton of an element in an array. That's where the .findIndex() method comes in. Calling .findIndex() on an array will return the index of the first element that evaluates to true in the callback function.

The .reduce() Method
Another widely used iteration method is .reduce(). The reduce() method returns a single value after iterating through the elements of an array. thereby reducing the array. Take a look at the example below:

Iterator Documentation
There are many additonal bulit-in array methods, a complete list of whuch is on the MDN's Array iteration method page. THe documentation for each method contains several sections:
- 1. A short definition
- 2. A block with the correct syntax for using the method.
- 3. A list of parameters the methods accept or requires
- 4. The return value of the function
- 5. An extended description
- 6. Examples of the methods use.
- 7. Other additional information.
Introduction to Objects
It's time to learn more about the basic structure that permeates nearly every aspect of JavaScript programming: objects. You're probably already more comfortable with objects than you think, becuase JavaScript loves objects. Many components of the language are actually objects under the hood, and even the parts that aren’t— like strings or numbers— can still act like objects in some instances.
There are only seven fundamental data types in JavaScript, and six of those are the primitive data types: string, number, boolean, null, undefined, and symbol. With the seventh type, objects, we open our code to more complex possibilities. We can use JavaScript objects to model real-world things, like a basketball, or we can use objects to build the data structures that make the web possible. At their core, JavaScript objects are containers storing related data and functionality, but that deceptively simple task is extremely powerful in practice. You’ve been using the power of objects all along, but now it’s time to understand the mechanics of objects and start making your own!
Creating Object Literals
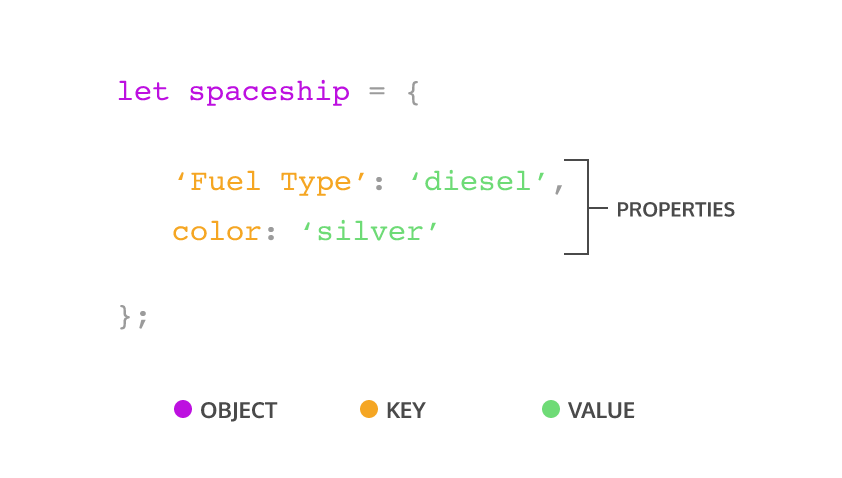
Objects can be assigned to variables just like any JavaScript type. We use curly braces, {}, to designate an object literal:
We fill an object with unordered data. This data is organized into a key-value-pairs. A key is like a variable name that points to a location in memmory that holds a value. A key’s value can be of any data type in the language including functions or other objects. We make a key-value pair by writing the key’s name, or identifier, followed by a colon and then the value. We separate each key-value pair in an object literal with a comma (,). Keys are strings, but when we have a key that does not have any special characters in it, JavaScript allows us to omit the quotation marks:
Accessing Properties
There are two ways we can access an object’s property. Let’s explore the first way— dot notation.

Bracket Noration
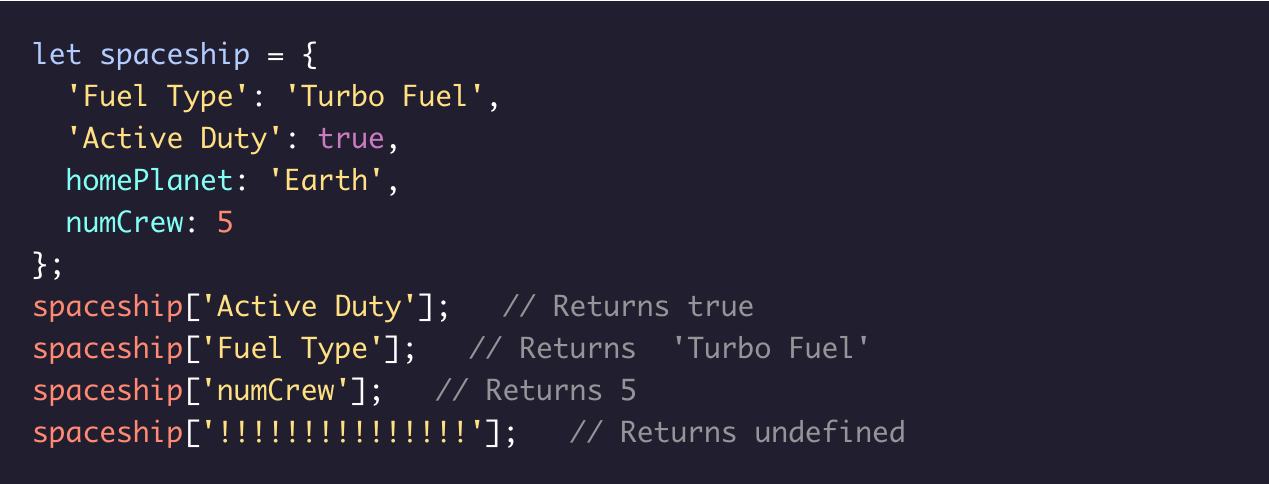
The second way to access a key’s value is by using bracket notation, [ ]. We must use bracket notation when accessing keys that have numbers, spaces, or special characters in them. Without bracket notation in these situations, our code would throw an error.With bracket notation you can also use a variable inside the brackets to select the keys of an object. This can be especially helpful when working with functions.
Property Assignment
Once we've defined an object, we're not stuck with all the properties we wrote. Objects are mutable meaning we can update them after we create them. We can use either dot notation . or bracket notation [], and the assignment operator = to add new key value pairs to an object or change a existing property.
One of two things can happen with property assignment:
- If the property already exists on the object, whatever value it held before will be replaced with the newly assigned value.
- If there was no property with that name, a new property will be added to the object.
It’s important to know that although we can’t reassign an object declared with const, we can still mutate it, meaning we can add new properties and change the properties that are there.
Methods
When the data stored on an object is a function we call that a method. A property is what an object has, while a method is what an object does. Do object methods seem familiar? That’s because you’ve been using them all along! For example console is a global javascript object and .log() is a method on that object. Math is also a global javascript object and .floor() is a method on it. We can include methods in our object literals by creating ordinary, comma-separated key-value pairs. The key serves as our method’s name, while the value is an anonymous function expression.

With the new method syntax introduced in ES6 we can omit the colon and the function keyword.

Nested Objects
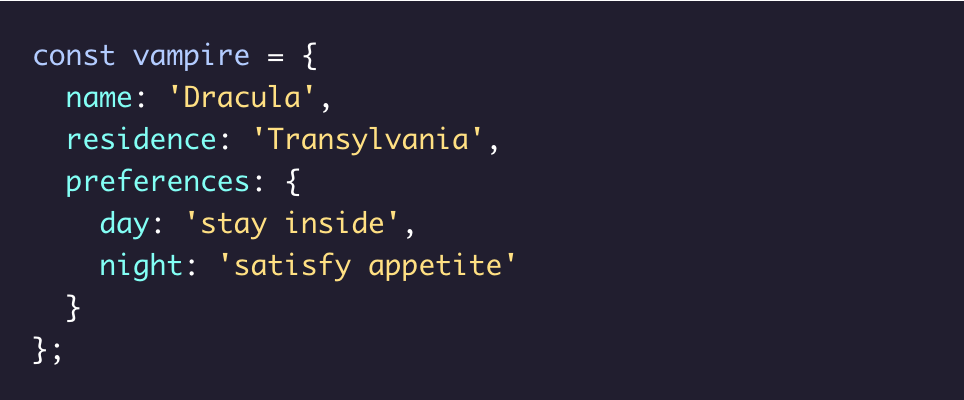
In application code, objects are often nested— an object might have another object as a property which in turn could have a property that’s an array of even more objects! In our spaceship object, we want a crew object. This will contain all the crew members who do important work on the craft. Each of those crew members are objects themselves. They have properties like name, and degree, and they each have unique methods based on their roles. We can also nest other objects in the spaceship such as a telescope or nest details about the spaceship’s computers inside a parent nanoelectronics object.
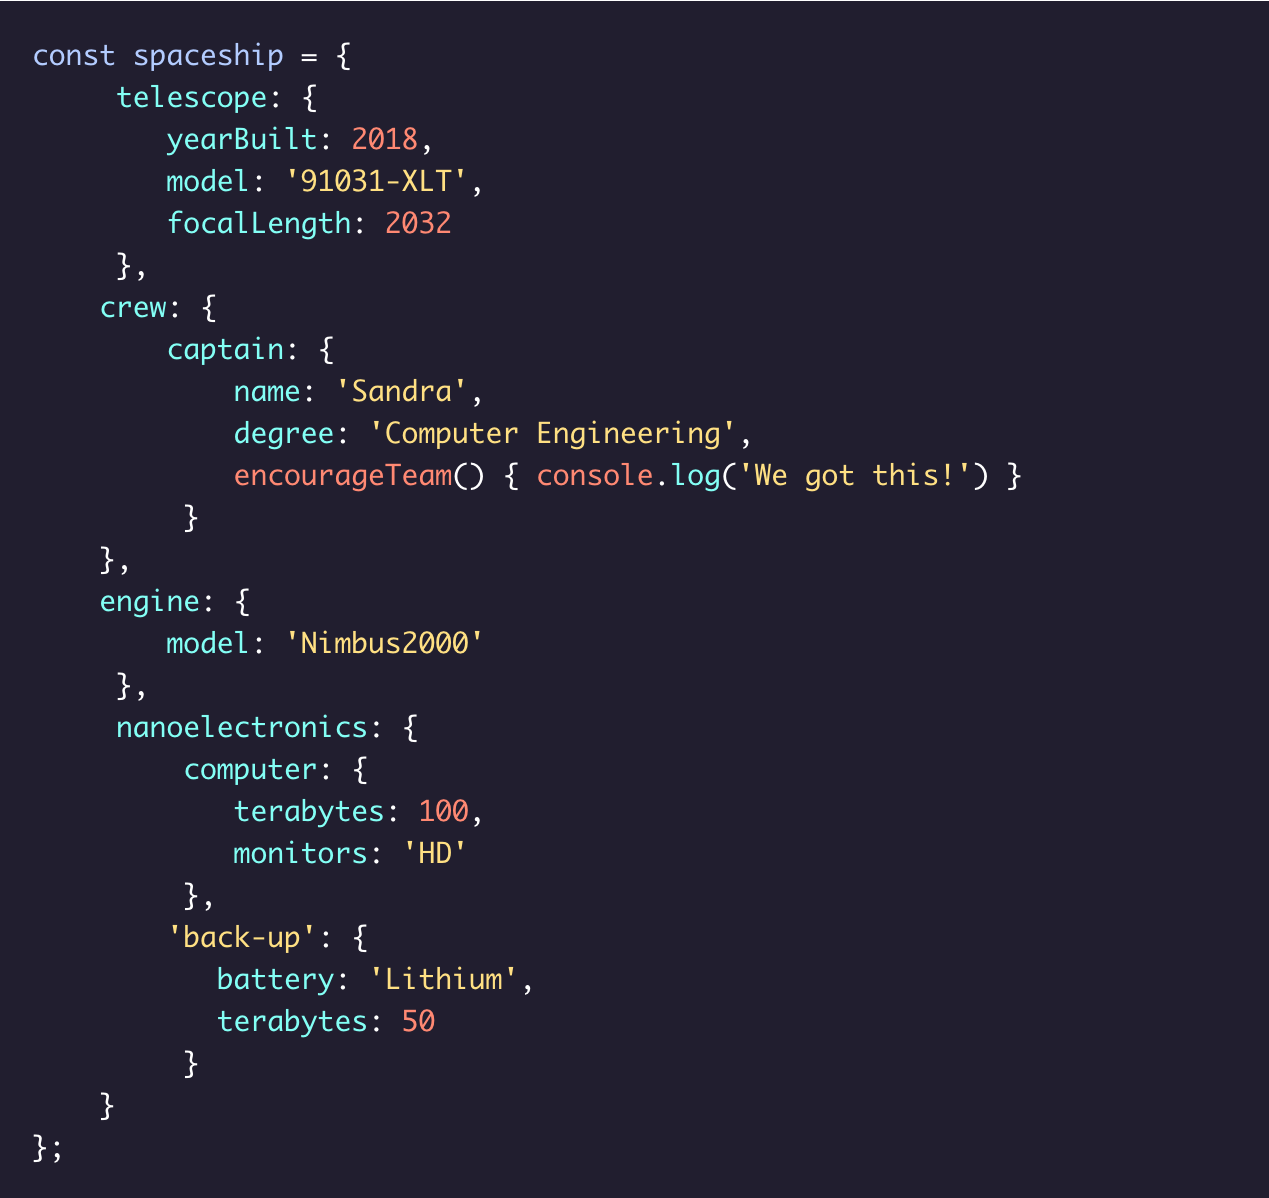
Pass by Reference
Objects are passed by reference. This means when we pass a variable assigned to an object into a function as an argument, the computer interprets the parameter name as pointing to the space in memory holding that object. As a result, functions which change object properties actually mutate the object permanently(even when the object is assigned to a const variable.)
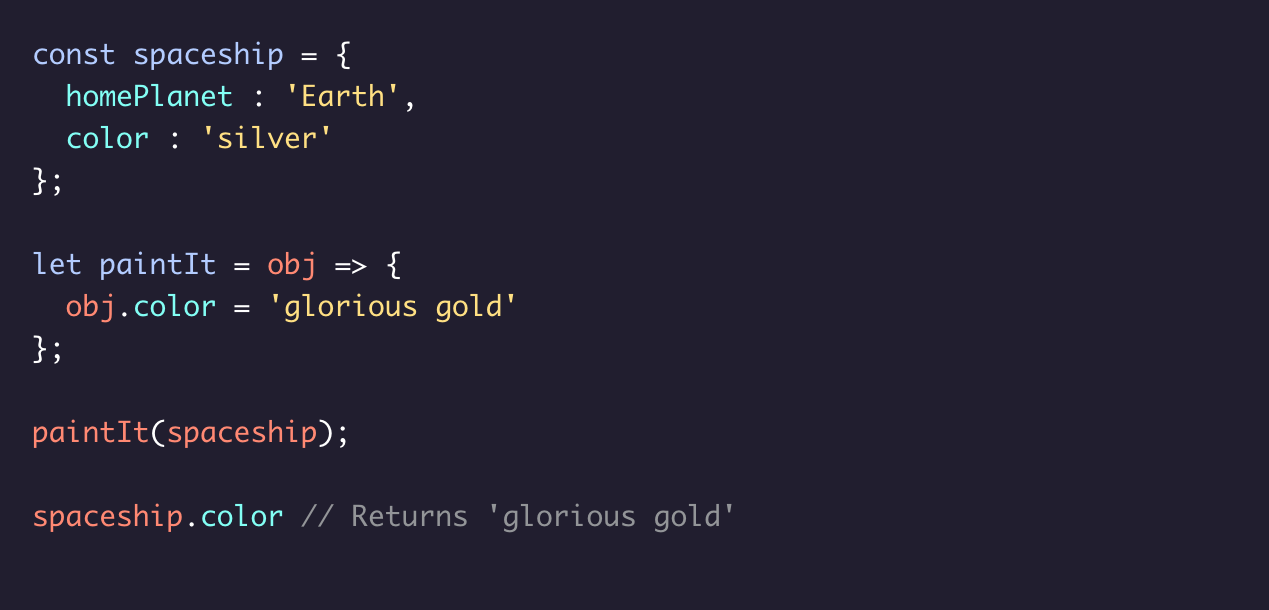

Looping Through Objects
Loops are programming tools that repeat a block of code until a condition is met. We learned how to iterate through arrays using their numerical indexing, but the key-value pairs in objects aren’t ordered! JavaScript has given us alternative solution for iterating through objects with the for...in syntax . for...in will execute a given block of code for each property in an object.

Advanced Objects
Remember, objects in javascript are containers that store data and functionality. So if there are no objections, let's learn more about objects.
- how to use the this keyword
- converying privacy in JavaScript methods
- defining getters and setters in objects
- creating factory functions
- using destructuring techniques
The this keyword
Objects are collections of related data and functionality. We store that functionality in methods on our objects. The this keyword references the calling object which provides access to the calling object's properties.
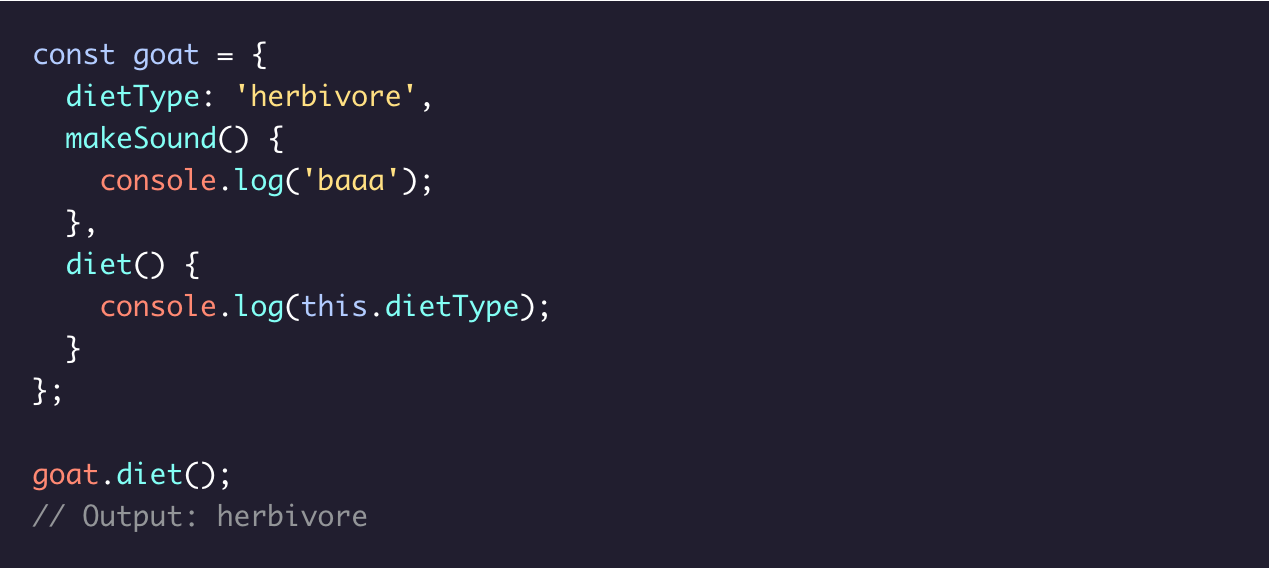
Arrow Functions and this
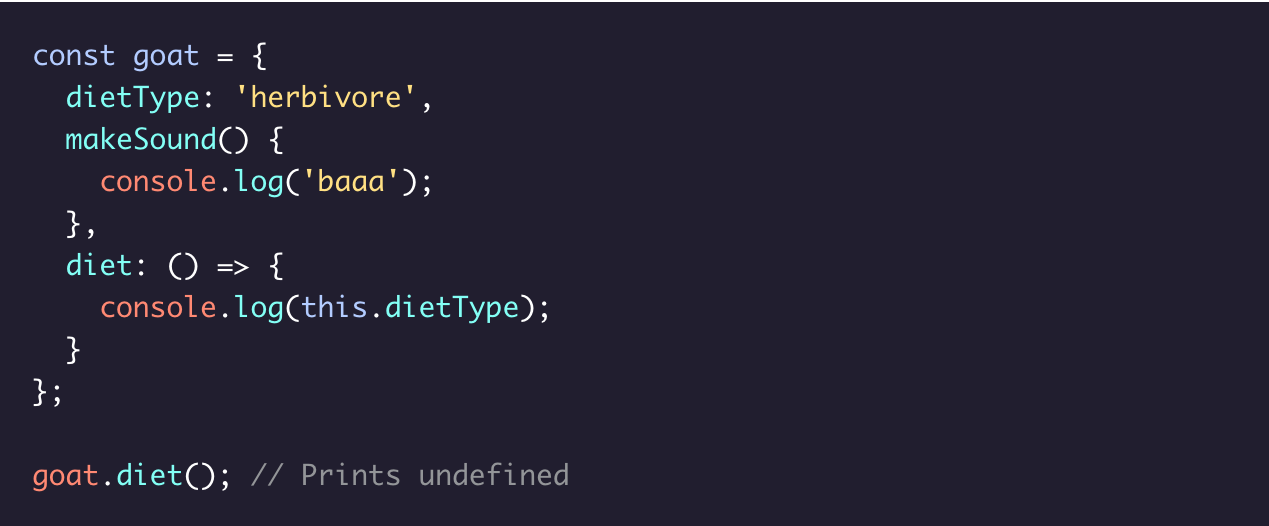
Arrow functions ingerently bind, or tie, an already defined this value to the function itself thay is NOT the calling object. To read more about arrow functions or the global object check out the MDN documentation. The key takeaway is to avoid using arrow function when using this keyword.
Privacy
Accessing and updating properties is fundamental in working with objects. However, there are cases in which we don't want other code simply accessing and updating an objects, we define it as the idea that only certain properties should be mutable or able to change in value.
Certain languages have privacy built-in for objects, but JavaScript does not have this feature. Rather, JavaScript developers follow naming conventions that signal to other developers how to interact with a property. One common convention is to place an underscore _ before the name of a property to mean that the property should not be altered.

Getters
Getters are methods that get and return the internal properties of an object. But they can do more than just retrieve the value of a property.
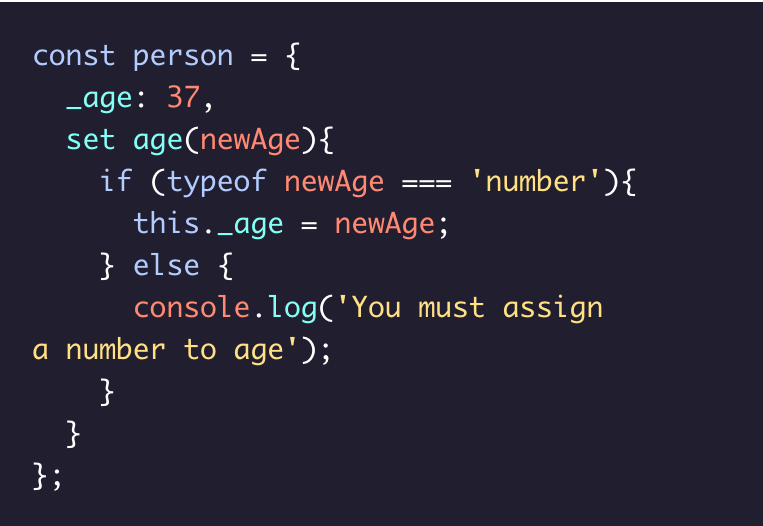
Setters
Along with getter methods, we can also create setter methods which reassign values of existing properties with an object.
Factory Functions
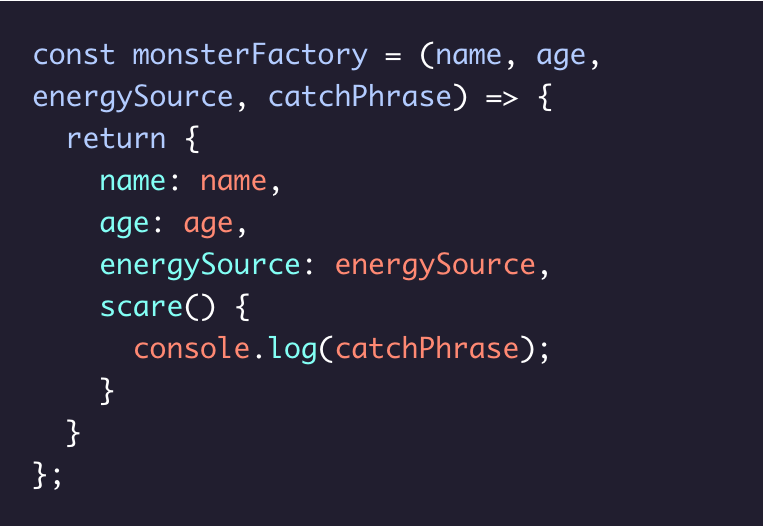
So far we've been creating objects individually, but there are times where we want to create many instances of an object quickly. Here's where factory functions come in. A real world factory manufactures multiple copies of an item quickly and on a massive scale. A factory function is a function that returns an object and can be reused to make multiple object instnaces.Factory functions can also have parameters allowing us to customize the object that gets returned.
Let's say we wanted to create an object to represent monsters in JavaScript. There are many different types of monsters and we could go about making each monster individually but we can also use a factory function to make our lives easier.
Property Value Shorthand
ES6 introduced some new shortcuts for assigning properties to variables known as destructuring.
Destructured Assignment
We often want to extract key-value pairs from objects and save them as variables.
Built-in Object Methods
In the previous exercises we've been creating instances of objects that have their own methods. But, we can also take advantage of built-in methods for Objects.
For example, we have access to object instance methods like: .hasOwnProperty(), .valueOf(), and many more. Practice your documentation reading skills and check out: MDN object instance documentation.
There are also useful Object class methods such as Object.assign(), Object.entries(), and Object.keys() just to name a few. For a comprehensive list, browse MDN object instance documentation.
Introduction to Classes
JavaScript is an object-oriented programming language we can use to model real-world items. In this lesson, you will learn how to make classes. Classes are a tool that developers use to quickly produce similar objects.
Constructor
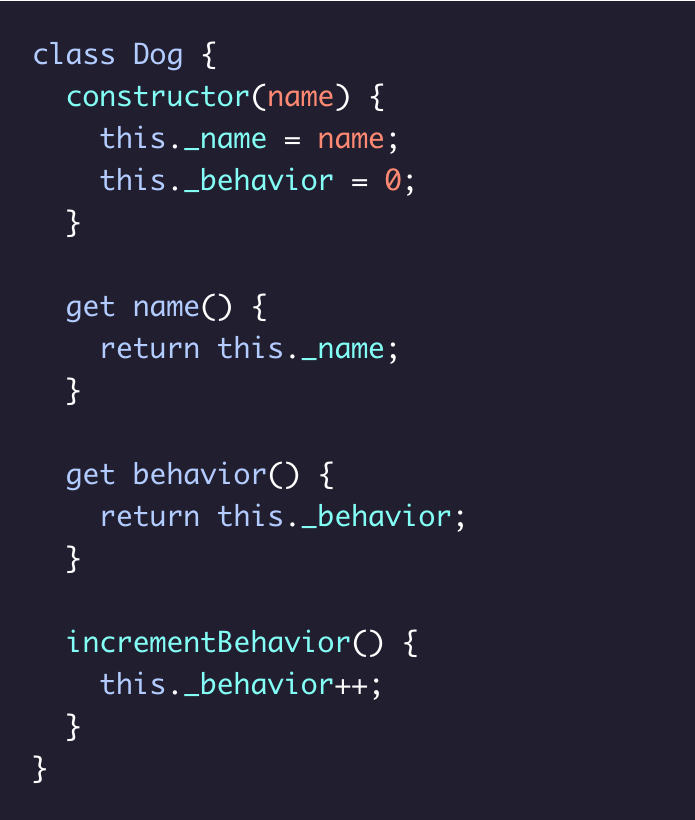
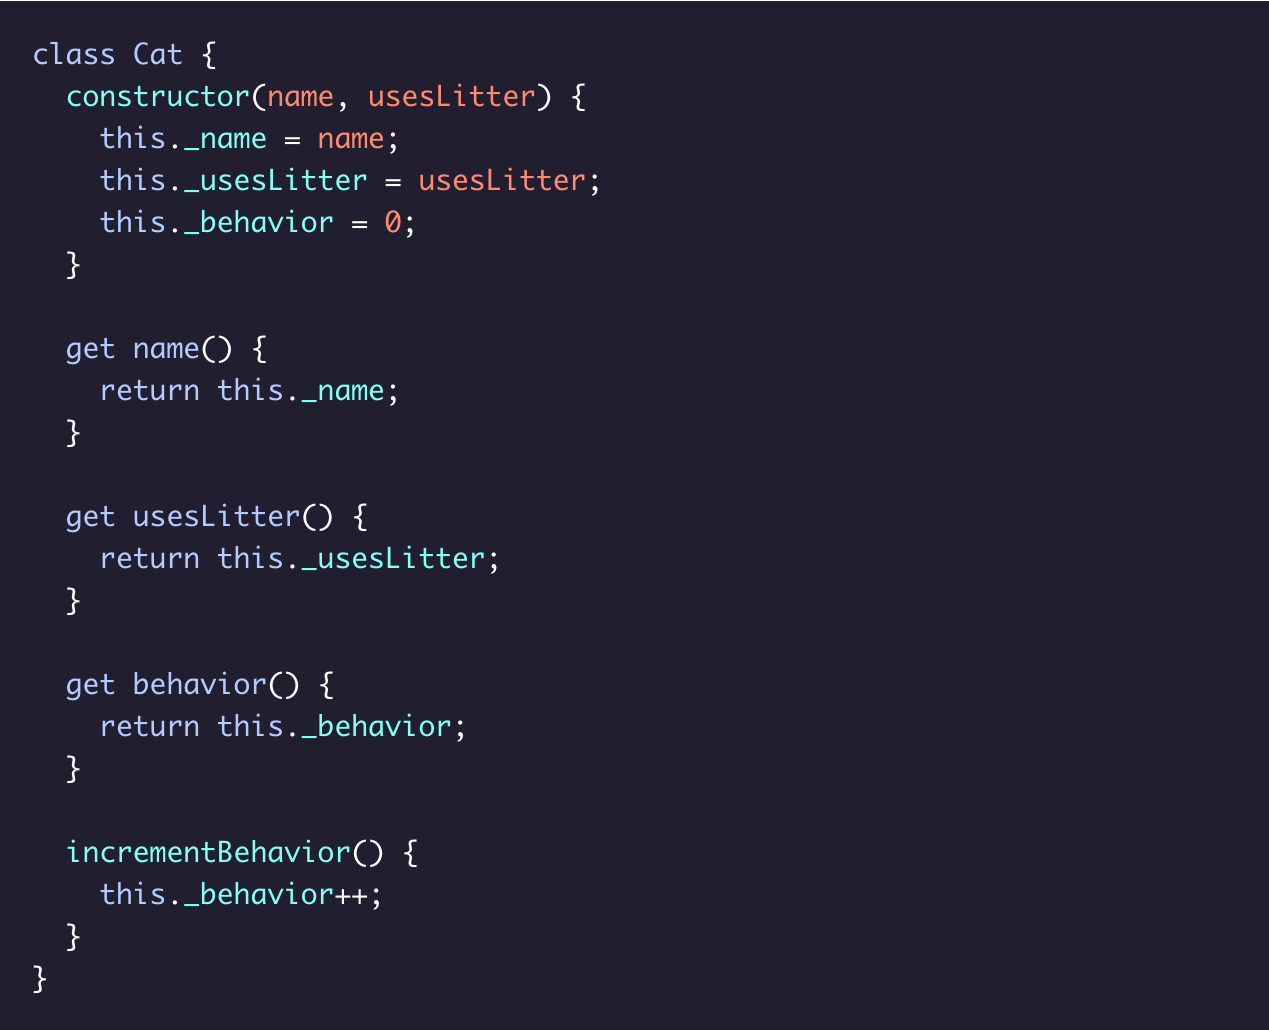
Although you may see similarities between class and object syntax, there is one important method that sets them apart. It's called the constructor method. JavaScript calls the constructor() method every time it creates a new instance of a class.

Instance
Now, we're ready to create class instances. An instance is an object that contains the property names and methods of a class, but with unique property values.

Classes - Methods
Below, we will add getters and a method to bring our class to life. Class method and getter syntax is the same as it is for objects except you can not include commad between methods.
Classes - Inheritance
When multiple classes share properties or methods, they become candidates for inheritance - a tool developers use to decrease the amount of code they need to write.
With inheritance, you can create a parent class (also know as a superclass) with properties and methods that multiple child classes(also known as subclasses) share. The child classes inherit the properties and methods from their parent class.
Classes - Static Methods
Sometimes you will want a class to have methods that aren't avaiable in individual instances, but that you can directylt from the class.
Browser Compatibility and Transpilation
You're probably prompted to update your web browser every few months. Do you know why? A few reasons include addressing security vulnerabilities, adding features, and supporting new HTML, CSS and JavaScript syntax. The reasons above imply there is a period before a software update is released when there are security vulnerabilites and unsipported language syntax.
This lesson focuses on the latter. Specifically, how developers address the gap between the new JavaScript syntax that they use and the JavaScript syntax that web browsers recongnize.
This has become a widespread concern for web developers since Ecma international, the organziation responsible for standardizing JavaScript, released a new version of it in 2015, called ECMAScript2015, commonly referred to as ES6. Note, the 6 refers to the version of JavaScript and is not related to the year it was released (the previous version was ES5).
Upon release, web developers quickly adopted the new ES6 syntax, as it improved readability and efficiency. However, ES6 was not supported by most web browsers, so developers ran into browser compatibility issues.
- caniuse.com — A website that provides data on web browser compatibility for HTML, CSS, and JavaScript features. You will learn how to use it to look up ES6 feature support.
- Babel — A Javascript library that you can use to convert new, unsupported JavaScript (ES6), into an older version (ES5) that is recognized by most modern browsers.
Why ES6
The version of JavaScript that preceded ES6 is called JavaScript ES5. Three reasons for the ES5 to ES6 updates are listed below:
- Readability and economy of code — The new syntax is often easier to understand (more readable) and requires fewer characters to create the same functionality (economy of code).
- Addresses sources of ES5 bugs — Some ES5 syntax led to common bugs. With ES6, Ecma introduced syntax that mitigates some of the most common pitfalls.
- A similarity to other programming languages — JavaScript ES6 is syntactically more similar to other object-oriented programming languages. This leads to less friction when experienced, non-JavaScript developers want to learn JavaScript.
Transpilation With Babel
Because ES6 is predictably backwards compatible, a collection of JavaScript programmers developed a JavaScript library called Babel that transpiles ES6 JavaScript to ES5. Transpilation is the process of converting one programming language to another.
npm init
In the last exercise, you wrote one command in your terminal to transpile ES6 to ES5. Before you install Babel, we need to setup our project to use the node package manager (npm). Developers use npm to access and manage Node packages. Node packages are directories that contain JavaScript code written by other developers. You can use these packages to reduce duplication of work and avoid bugs.
Before we can add Babel to our project directory, we need to run npm init. The npm init command creates a package.json file in the root directory. A package.json file contains information about the current JavaScript project. Some of this information includes:
- Metadata — This includes a project title, description, authors, and more.
- A list of node packages required for the project — If another developer wants to run your project, npm looks inside package.json and downloads the packages in this list.
- Key-value pairs for command line scripts — You can use npm to run these shorthand scripts to perform some process. In a later exercise, we will add a script that runs Babel and transpiles ES6 to ES5.
If you have Node installed on your computer, you can create a package.json file by typing npm init into the terminal. The terminal prompts you to fill in fields for the project’s metadata (name, description, etc.) You are not required to answer the prompts, though we recommend at minimum, you add your own title and description. If you don’t want to fill in a field, you can press enter. npm will leave fill these fields with default values or leave them empty when it creates the package.json file. After you run npm init your directory structure will contain the following files and folders:

Install Node Packages
We use the npm install command to install new Node packages locally. The install command creates a folder called node_modules and copies the package files to it. The install command also installs all of the dependencies for the given package. To install Babel, we need to npm install two packages, babel-cli and babel-preset-env. However, npm installs over one hundred other packages that are dependencies for Babel to run properly. We install Babel with the following two commands:
The babel-cli package includes command line Babel tools, and the babel-preset-env package has the code that maps any JavaScript feature, ES6 and above (ES6+), to ES5. The -D flag instructs npm to add each package to a property called devDependencies in package.json. Once the project’s dependencies are listed in devDependencies, other developers can run your project without installing each package separately. Instead, they can simply run npm install — it instructs npm to look inside package.json and download all of the packages listed in devDependencies. Once you npm install packages, you can find the Babel packages and all their dependencies in the node_modules folder. The new directory structure contains the following:

.babelrc
Now that you’ve downloaded the Babel packages, you need to specify the version of the source JavaScript code. You can specify the initial JavaScript version inside of a file named .babelrc. In your root directory, you can run touch .babelrc to create this file.
Inside .babelrc you need to define the preset for your source JavaScript file. The preset specifies the version of your initial JavaScript file. Usually, you want to transpile JavaScript code from versions ES6 and later (ES6+) to ES5. From this point on, we will refer to our source code as ES6+, because Ecma introduces new syntax with each new version of JavaScript. To specify that we are transpiling code from an ES6+ source, we have to add the following JavaScript object into .babelrc:
When you run Babel, it looks in .babelrc to determine the version of the initial JavaScript file. In this case, ["env"] instructs Babel to transpile any code from versions ES6 and later.
Babel Source Lib
There’s one last step before we can transpile our code. We need to specify a script in package.json that initiates the ES6+ to ES5 transpilation. Inside of the package.json file, there is a property named "scripts" that holds an object for specifying command line shortcuts. It looks like this:

In the code above, the "scripts" property contains an object with one property called "test". Below the "test" property, we will add a script that runs Babel like this:

In the "scripts" object above, we add a property called "build". The property’s value, "babel src -d lib", is a command line method that transpiles ES6+ code to ES5. Let’s consider each argument in the method call:
- babel - The babel command call responsible for transpiling code.
- src — Instructs Babel to transpile all JavaScript code inside the src directory.
- -d — Instructs Babel to write the transpiled code to a directory.
- lib — Babel writes the transpiled code to a directory called lib.
JavaScript Promises
In web development, asynchronous programming is notorious for being a challenging topic.
An asynchronous operation is one that allows the computer to “move on” to other tasks while waiting for the asynchronous operation to complete. Asynchronous programming means that time-consuming operations don’t have to bring everything else in our programs to a halt.
There are countless examples of asynchronicity in our everyday lives. Cleaning our house, for example, involves asynchronous operations such as a dishwasher washing our dishes or a washing machine washing our clothes. While we wait on the completion of those operations, we’re free to do other chores.
Similarly, web development makes use of asynchronous operations. Operations like making a network request or querying a database can be time-consuming, but JavaScript allows us to execute other tasks while awaiting their completion.
This lesson will teach you how modern JavaScript handles asynchronicity using the Promise object, introduced with ES6.
What is a promise?
Promises are objects that represent the eventual outcome of an asynchronous operation. A Promise object can be in one of three states:
- Pending: The initial state— the operation has not completed yet.
- Fulfilled: The operation has completed successfully and the promise now has a resolved value. For example, a request’s promise might resolve with a JSON object as its value.
- Rejected: The operation has failed and the promise has a reason for the failure. This reason is usually an Error of some kind.
Constructing a Promise Object
To Create a new Promise Object, we use the newkeyword and the Promise constructor

The Promise constructor method takes a function parameter called the executor function which runs automatically when the constructor is called. The executor function generally starts an asynchronous operation and dictates how the promise should be settled.
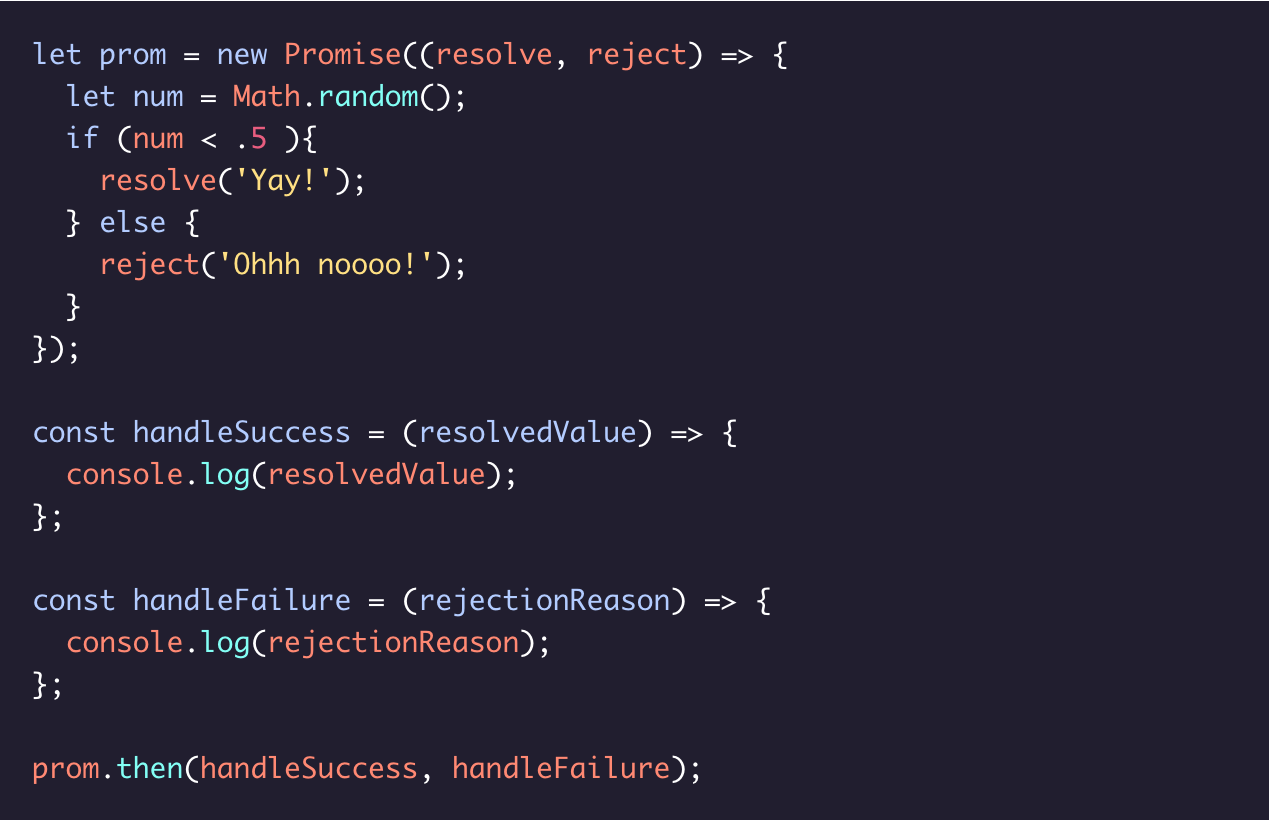
The executor function has two function parameters, usually referred to as the resolve() and reject() functions. The resolve() and reject() functions aren’t defined by the programmer. When the Promise constructor runs, JavaScript will pass its own resolve() and reject() functions into the executor function.
- resolve is a function with one argument. Under the hood, if invoked, resolve() will change the promise’s status from pending to fulfilled, and the promise’s resolved value will be set to the argument passed into resolve().
- reject is a function that takes a reason or error as an argument. Under the hood, if invoked, reject() will change the promise’s status from pending to rejected, and the promise’s rejection reason will be set to the argument passed into reject().

JavaScript Promises - The Node setTimeout() Function
Knowing how to construct a promise is useful, but most of the time, knowing how to sonsume, or use, promises will be key. Rather than constructing promises, you'll be handling Promises objects returned to you as the result of an asynchronous operation. These promises will start off pending but settle eventually.
Moving forward, we'll be simulating this by providing you with functions that return promises which settle after some time. To accomplish this, we'll be using setTimeout(), setTimeOut() is a Node API(a comparable API is provided by web browsers)that uses callback functions to sechedule tasks to be performed after a delay. seTimeour() has two parameters: a callback function and a delay in milliseconds.

Here, we invoke setTimeout() with the callback function delayedHello() and 2000. In at least two seconds delayedHello() will be invoked. But why is it "at least" two seconds and not exactly two seconds?
This delay is performed asynchronously - the rest of the program won't stop executing during the delay. Asynchronous JavaScript uses something called the event-loop. After two seconds, delayedHello()is added to a lone of code waiting to be run. Before it can run, any synchronous code from the program will run. Next, any code in front of it in the line will run. This means it might be more than two seconds before delayedHello() is actually executed.
Let's look at how we'll be using setTimeout() to construct asynchronous promises:

JavaScript Promises - Consuming Promises
The inital state of an asynchronous promise is pending, but we have a guarantee that it will settle. How do we tell the computer what should happen then. Promise objects come with an aptly named .then() method. It allows us to say. "I have a promise, when it settles, then here's what I want to happen".
.then() is a higher-order function - it takes two callback functions as arguments. We refer to these callbacks as handlers. When the promise settles, the appropriate handler will be invoked with that settled value.
- The first handler, sometimes called onFulfilled, is a success handler, and it should contain the logic for the promise resoliving.
- The second handler, sometimes called onRejected, is a failure handler, and it should contain the logic for the promise rejecting.
We can invoke .then() with one, both, or neither handler! This allows for flexibility, but it can also make for tricky debugging. If the appropriate handler is not provided, instead of throwing an error, .then() will just return a promise with the same settled value as the promise it was called on. One important feature of .then() is that it always returns a promise. We’ll return to this in more detail in a later exercise and explore why it’s so important.
Success and Failure Callback Functions
To handle a "successful" promise, or a promise that resolved, we invoke .then() on the promise, passing in a sucecess handler callback function:
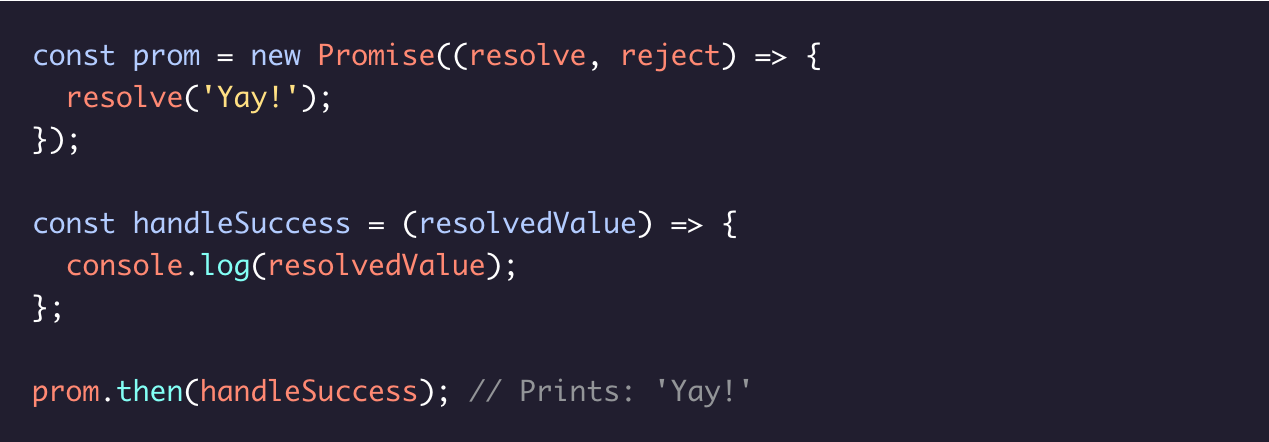
With typical promise consumption, we won't know weathter a priomise will resolve or reject, so we'll need to provide the logic for either case. We can pass both a success callback and a failure callback to .then().
Using catch() with Promises
One way to write cleaner code is to follow a principle called separation of concerns. Separation of concerns means organizing code into distince sections each handling a specific task. It enables us to quickly navigate our code and know where to look if something isn't working.
Remember, .then() will return a promise with the same settled value as the promise it was called on if no appropriate handler was provided. This implementation allows us to separate our resolved logic from our rejected logic. Instead of passing both handlers into one .then(), we can chain a second .then() with a failure handler to a first .then() with a success handler and both cases will be handled.

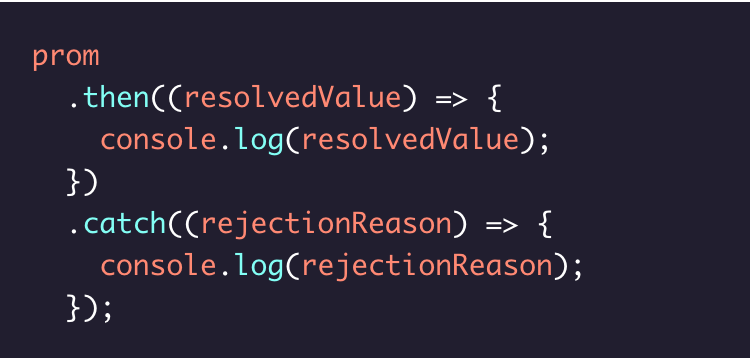
Since JavaScript doesn't mind whitespace, we follow a common convention of putting each part of this chain on a new line to make it easier to read. To create even more readable code, we can use a different promise function: .catch()
The .catch function takes only one argument, onRejected. In the case of a rejected promise, this failure handler will be invoked with the reason for rejection. Using .catch() accomplishes the same thing as using a .then with only a failure handler.
Chaining Multiple Promises
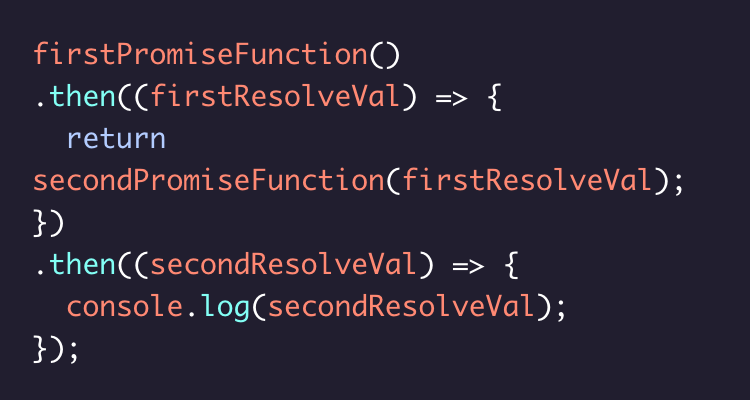
One common pattern we'll see with asynchronous programming is multiple operations which depend on each other to ececute or that must be executed in a certain order. We might make one request to a database and use the data returned to us to make another request and so on.
This process of chaining promises together is called composition. Promises are designed with composition in mind. Here's a simple promise chain in code:
Using Promises .all()
When done correctly, promise composition is a great way to handle situations where asynchronous operations depend on each other or execution order matters. What if we’re dealing with multiple promises, but we don’t care about the order? Let’s think in terms of cleaning again.
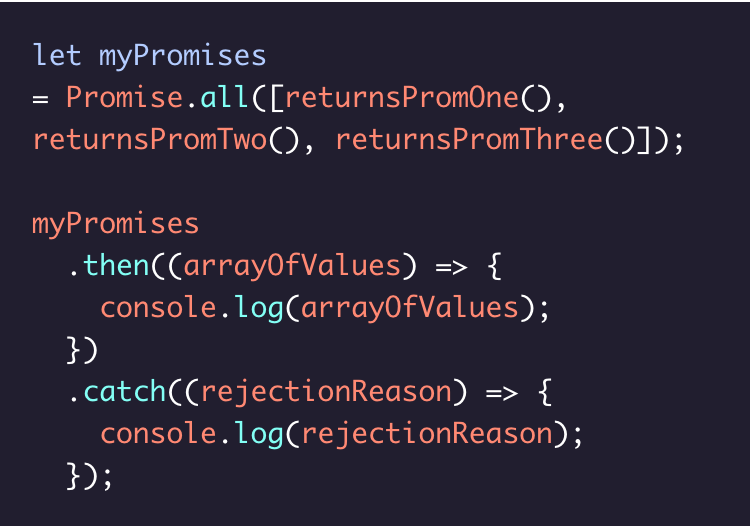
To maximize efficiency we should use concurrency, multiple asynchronous operations happening together. With promises, we can do this with the function Promise.all(). Promise.all() accepts an array of promises as its argument and returns a single promise. That single promise will settle in one of two ways:
- If every promise in the argument array resolves, the single promise returned from Promise.all() will resolve with an array containing the resolve value from each promise in the argument array.
- If any promise from the argument array rejects, the single promise returned from Promise.all() will immediately reject with the reason that promise rejected. This behavior is sometimes referred to as failing fast.
Async Await - Introduction
Often in web development, we need to handle asynchronous actions - actions we can wait on while moving on the other tasks. We make requests to networks, databases, or any number of similar operations. JavaScript is non-blocking: instead of stopping the exexution of code while it wait, JavaScript uses an event-loop which allows it to efficiently execute other tasks while it awaits the completion of these asynchronous actions.
Originally, JavaScript used callback functions to handle asynchronous actions. The problem with callbacks is that they encourage complexly nested code which quickly becomes difficult to read, debug, and scale. With ES6, JavaScript integrated native promises which allow us to write significantly more readable code. JavaScript is continually improving, and ES8 provides a new syntax for handling our asynchronous action, async...await. The async..await syntax allow us to write asynchronous action, async...await. The async...await syntax allows us to write asynchronous code that reads similarly to traditional synchronous, imperative programs.
The async...await syntax is syntatic sugar - it doesn't introduce new functionality into the language, but rather intoduces a new syntax for using promises and generators. Both of these were already built in to the language. Despite this. async...await powerfully improves the readability and scalability of our code.
The async Keyword
The async keyword is used to write functions that handle asynchronous actions. We wrap our asynchronous logic inside a function prepended with the async keyword. Then, we invoke that function.

We'll be using async functions declarations throughout this lesson, but we can also create async function expressions:

async functions always return a promise. This means we can use traditional promise syntax, like .then() and .catch with our async functions. An async function will return in one of three ways.
- If there nothing returned from the function, it will return a promise with a resolved value of undefined.
- If there's non-promise value returned from the function, it will return a promise resolved to that value.
- If a promise is returned from the function, it will simply return that promise.

The await Operator
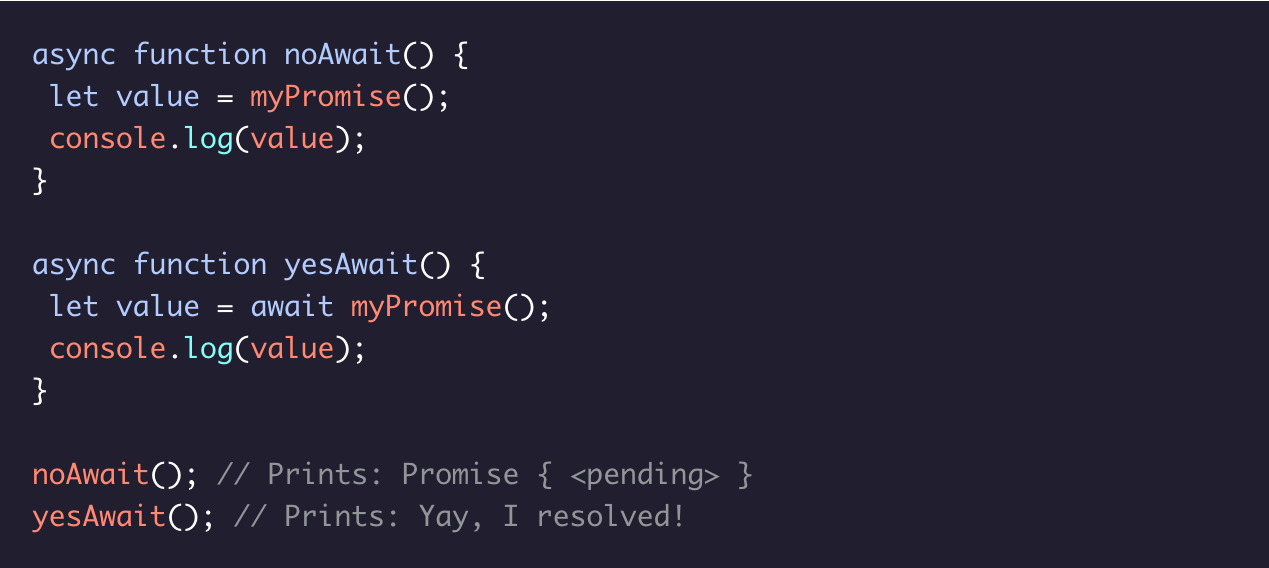
The await keyword can only be used inside an async function. await is an operator: it returns the resolved value of a promise. Since promises resolve in an indeterminate amount of time, await halts, or pauses, the execution of our async function until a given promise is resolved.
Writing async Functions
We've seen that the await keyword halts the execuation of an async function until a promises is no longer pending. Don't forget the await keyword. It may seem obvious, but this can be a tricky mistake to catch becuase our function will still run - it just won't have the desirted results.
Async await - Handling Dependent Promises
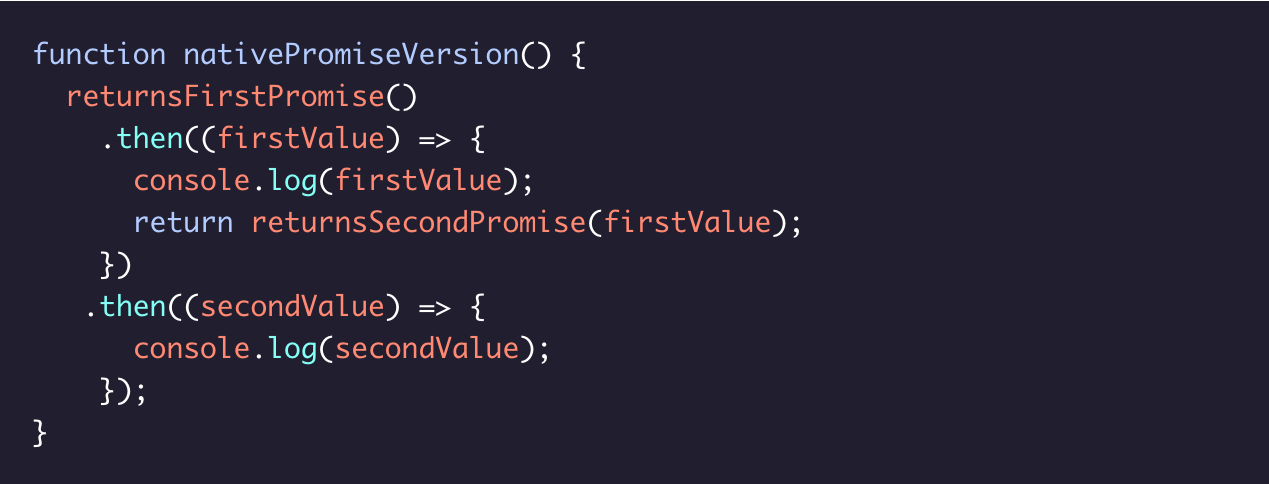
The true beauty of async...await is when we have a series of asynchronous actions which depend on one another. For example, we may make a network request based on a query to a database. In that case, we would need to wait to make the network request until we had the results from the database. With native promise syntax, we use a chain of .then() functions making sure to return correctly each one:
Introduction to Requests
Have you ever wondered what happens after you click a "Submit" button on a web page? For instance, if you are submitting information, where does the information go? How is the information processed? The answer to the previous questions revolves around HTTP requests.
There are many types of HTTP requests. The four most commonly used types of HTTP requests are GET, POST, PUT, and DELETE. In this lesson, we’ll cover GET and POST requests. If you want to learn more about the different HTTP requests, we recommend the following documentation:
Mozilla Developer Network: HTTP methodsWith a GET request, we’re retrieving, or getting, information from some source (usually a website). For a POST request, we’re posting information to a source that will process the information and send it back. In this lesson, we will explain how to make GET and POST requests by using JavaScript’s XHR object. We’ll also incorporate query strings into our requests. We’ll use the Datamuse API for GET requests and the Rebrandly URL Shortener API for POST requests. To complete the exercise on POST, make sure you create a Rebrandly API Key by following the instructions in the article below:
Codecademy Articles: Rebrandly URL Shortener API .HTTP Requests
One of JavaScript's greatest assets is its non-blocking properties, or that it is an asynchronous language.
Websites, like newspaper websites, take advantage of these non-blocking properties to provide a better user experience.Generally, a site’s code is written so that users don’t have to wait for a giant image to load before being allowed to read the actual article—rather, that text is rendered first and then the image can load in the background.
JavaScript uses an event loop to handle asynchronous function calls. When a program is run, function calls are made and added to a stack. The functions that make requests that need to wait for servers to respond then get sent to a separate queue. Once the stack has cleared, then the functions in the queue are executed.
Web developers use the event loop to create a smoother browsing experience by deciding when to call functions and how to handle asynchronous events. We’ll be exploring one system of technologies called Asynchronous JavaScript and XML, or AJAX.
XHR GET Requests I
Asynchronous JavaScript and XML (AJAX), enables requests to be made after the initial page load. Initially, AJAX was used only for XML formatted data, now it can be used to make requests that have many different formats.
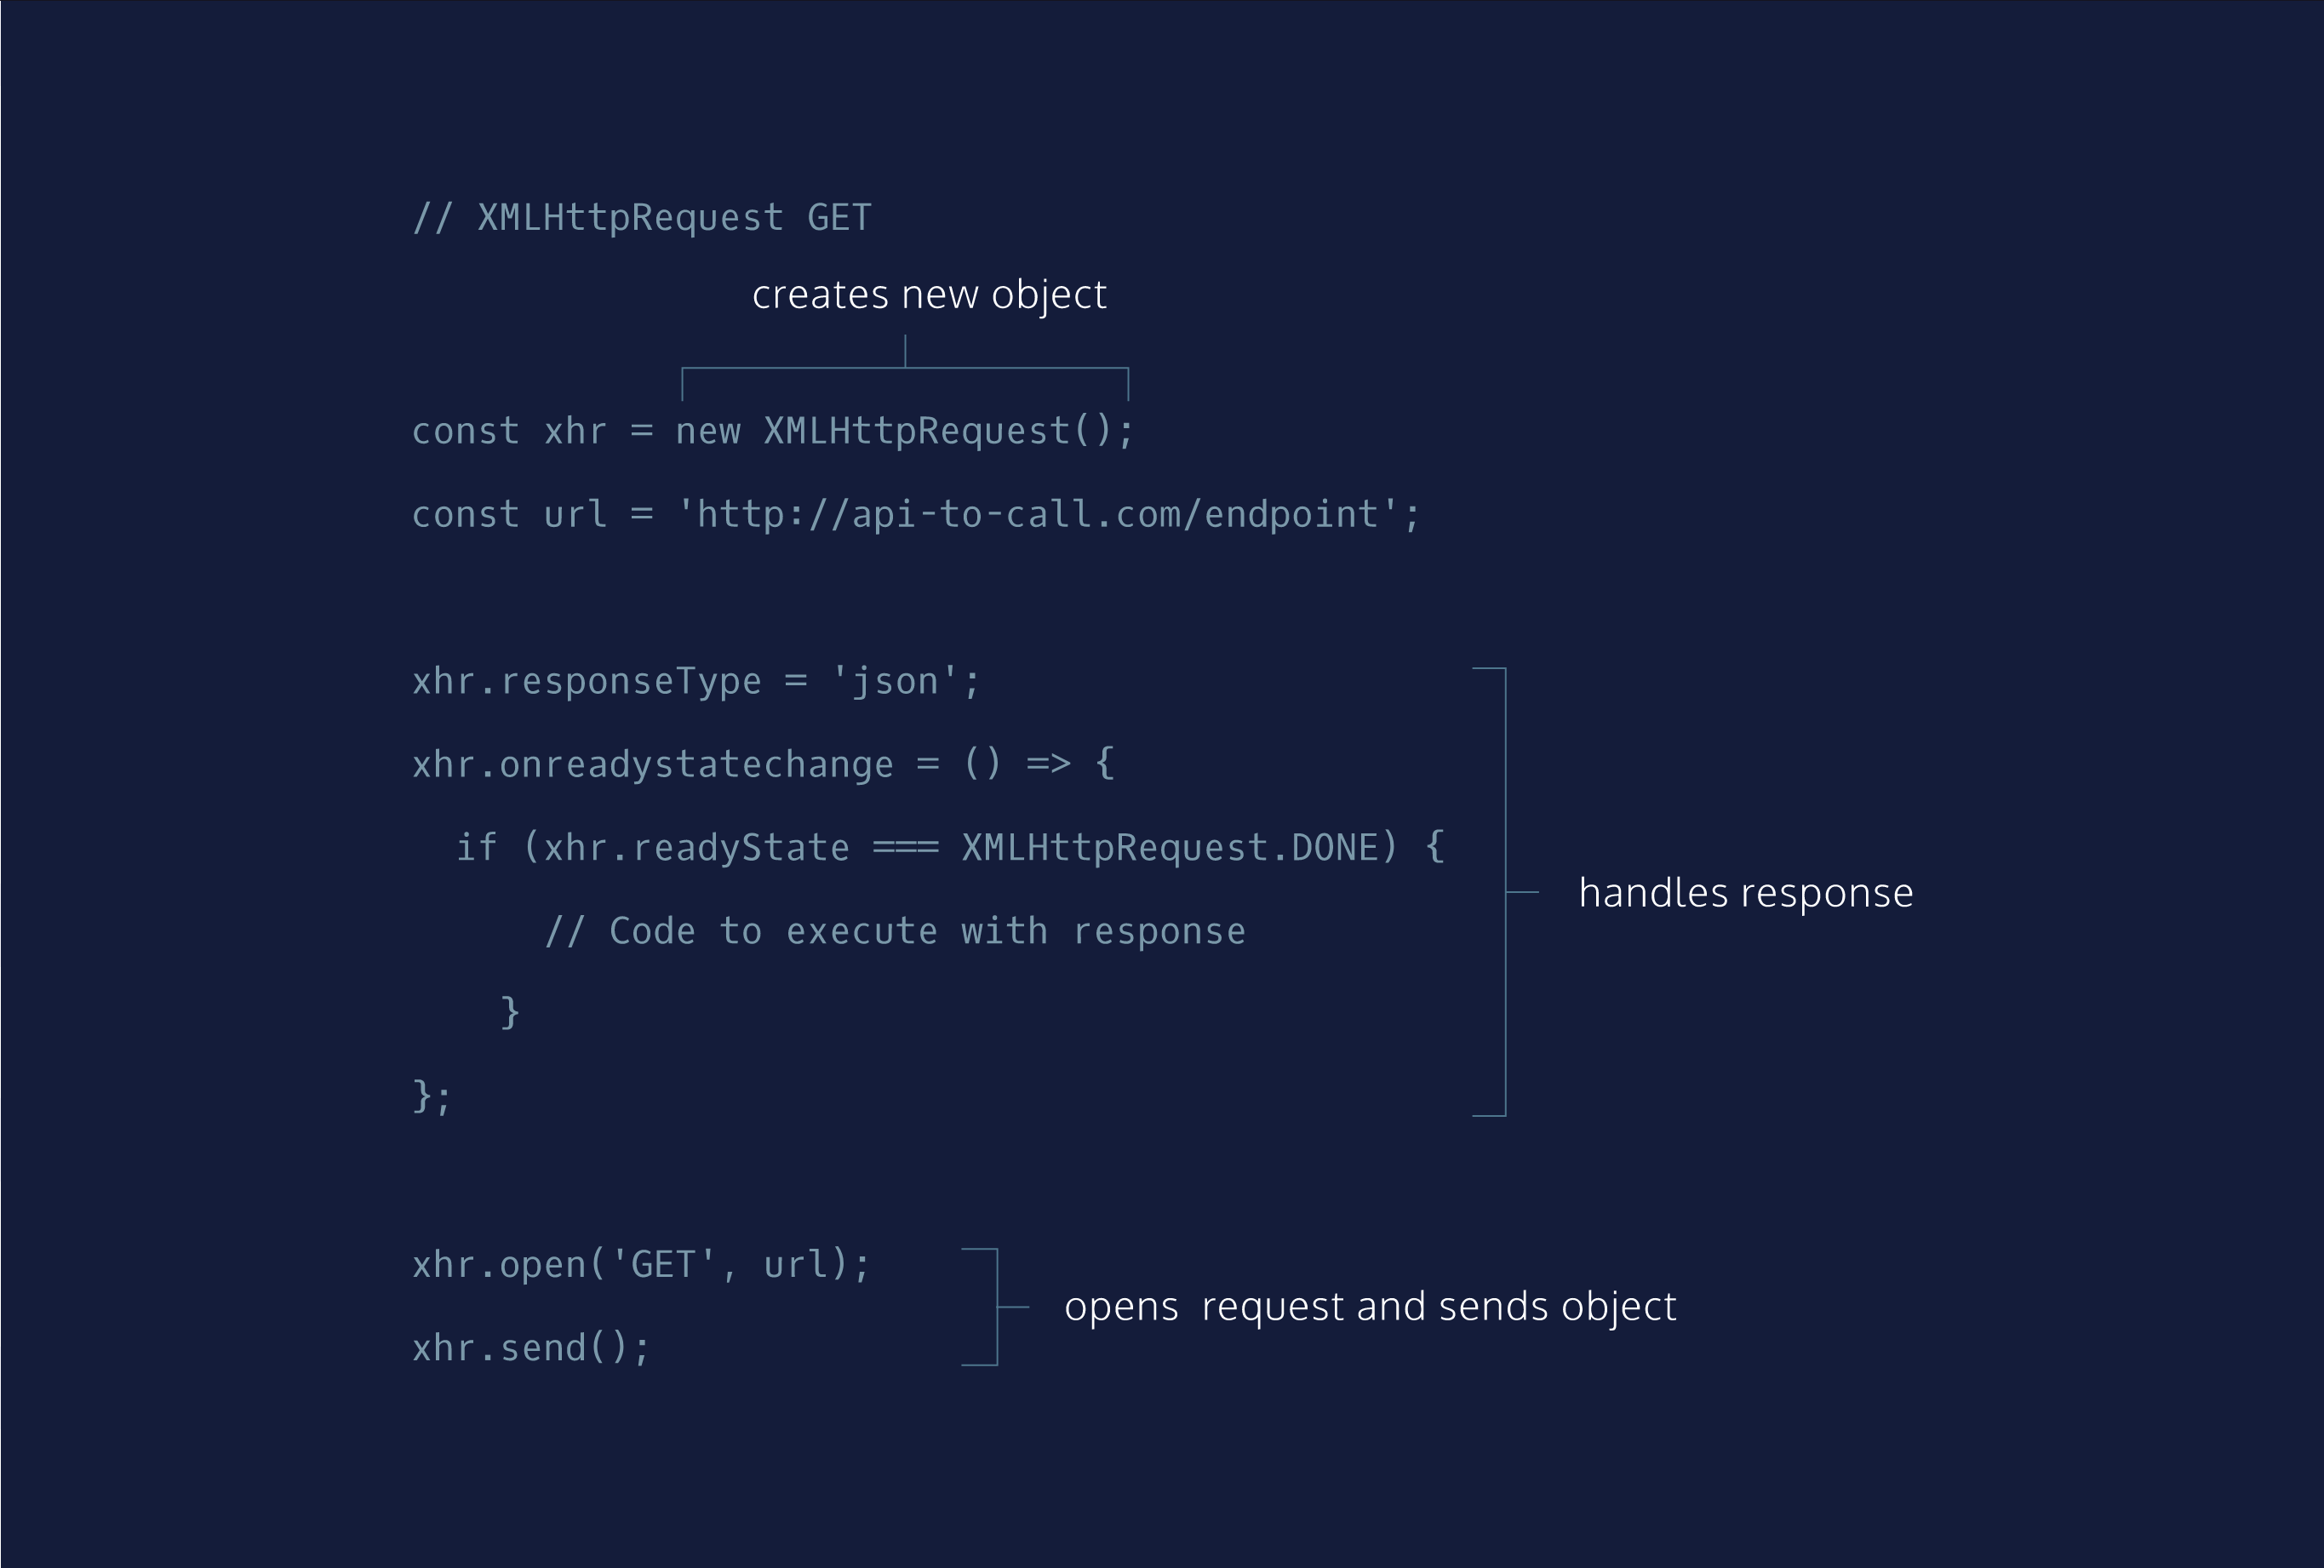
MDN Documentation: Extensible Markup Language (XML).Similarly, the XMLHttpRequest (XHR) API, named for XML, can be used to make many kinds of requests and supports other forms of data. Remember, we use GET to retrieve data from a source. Take a look at the boilerplate code in the diagram to see how to make an XHR GET request. We’ll construct this template from scratch in a different exercise and walk through what each step does.
XHR POST Requests I
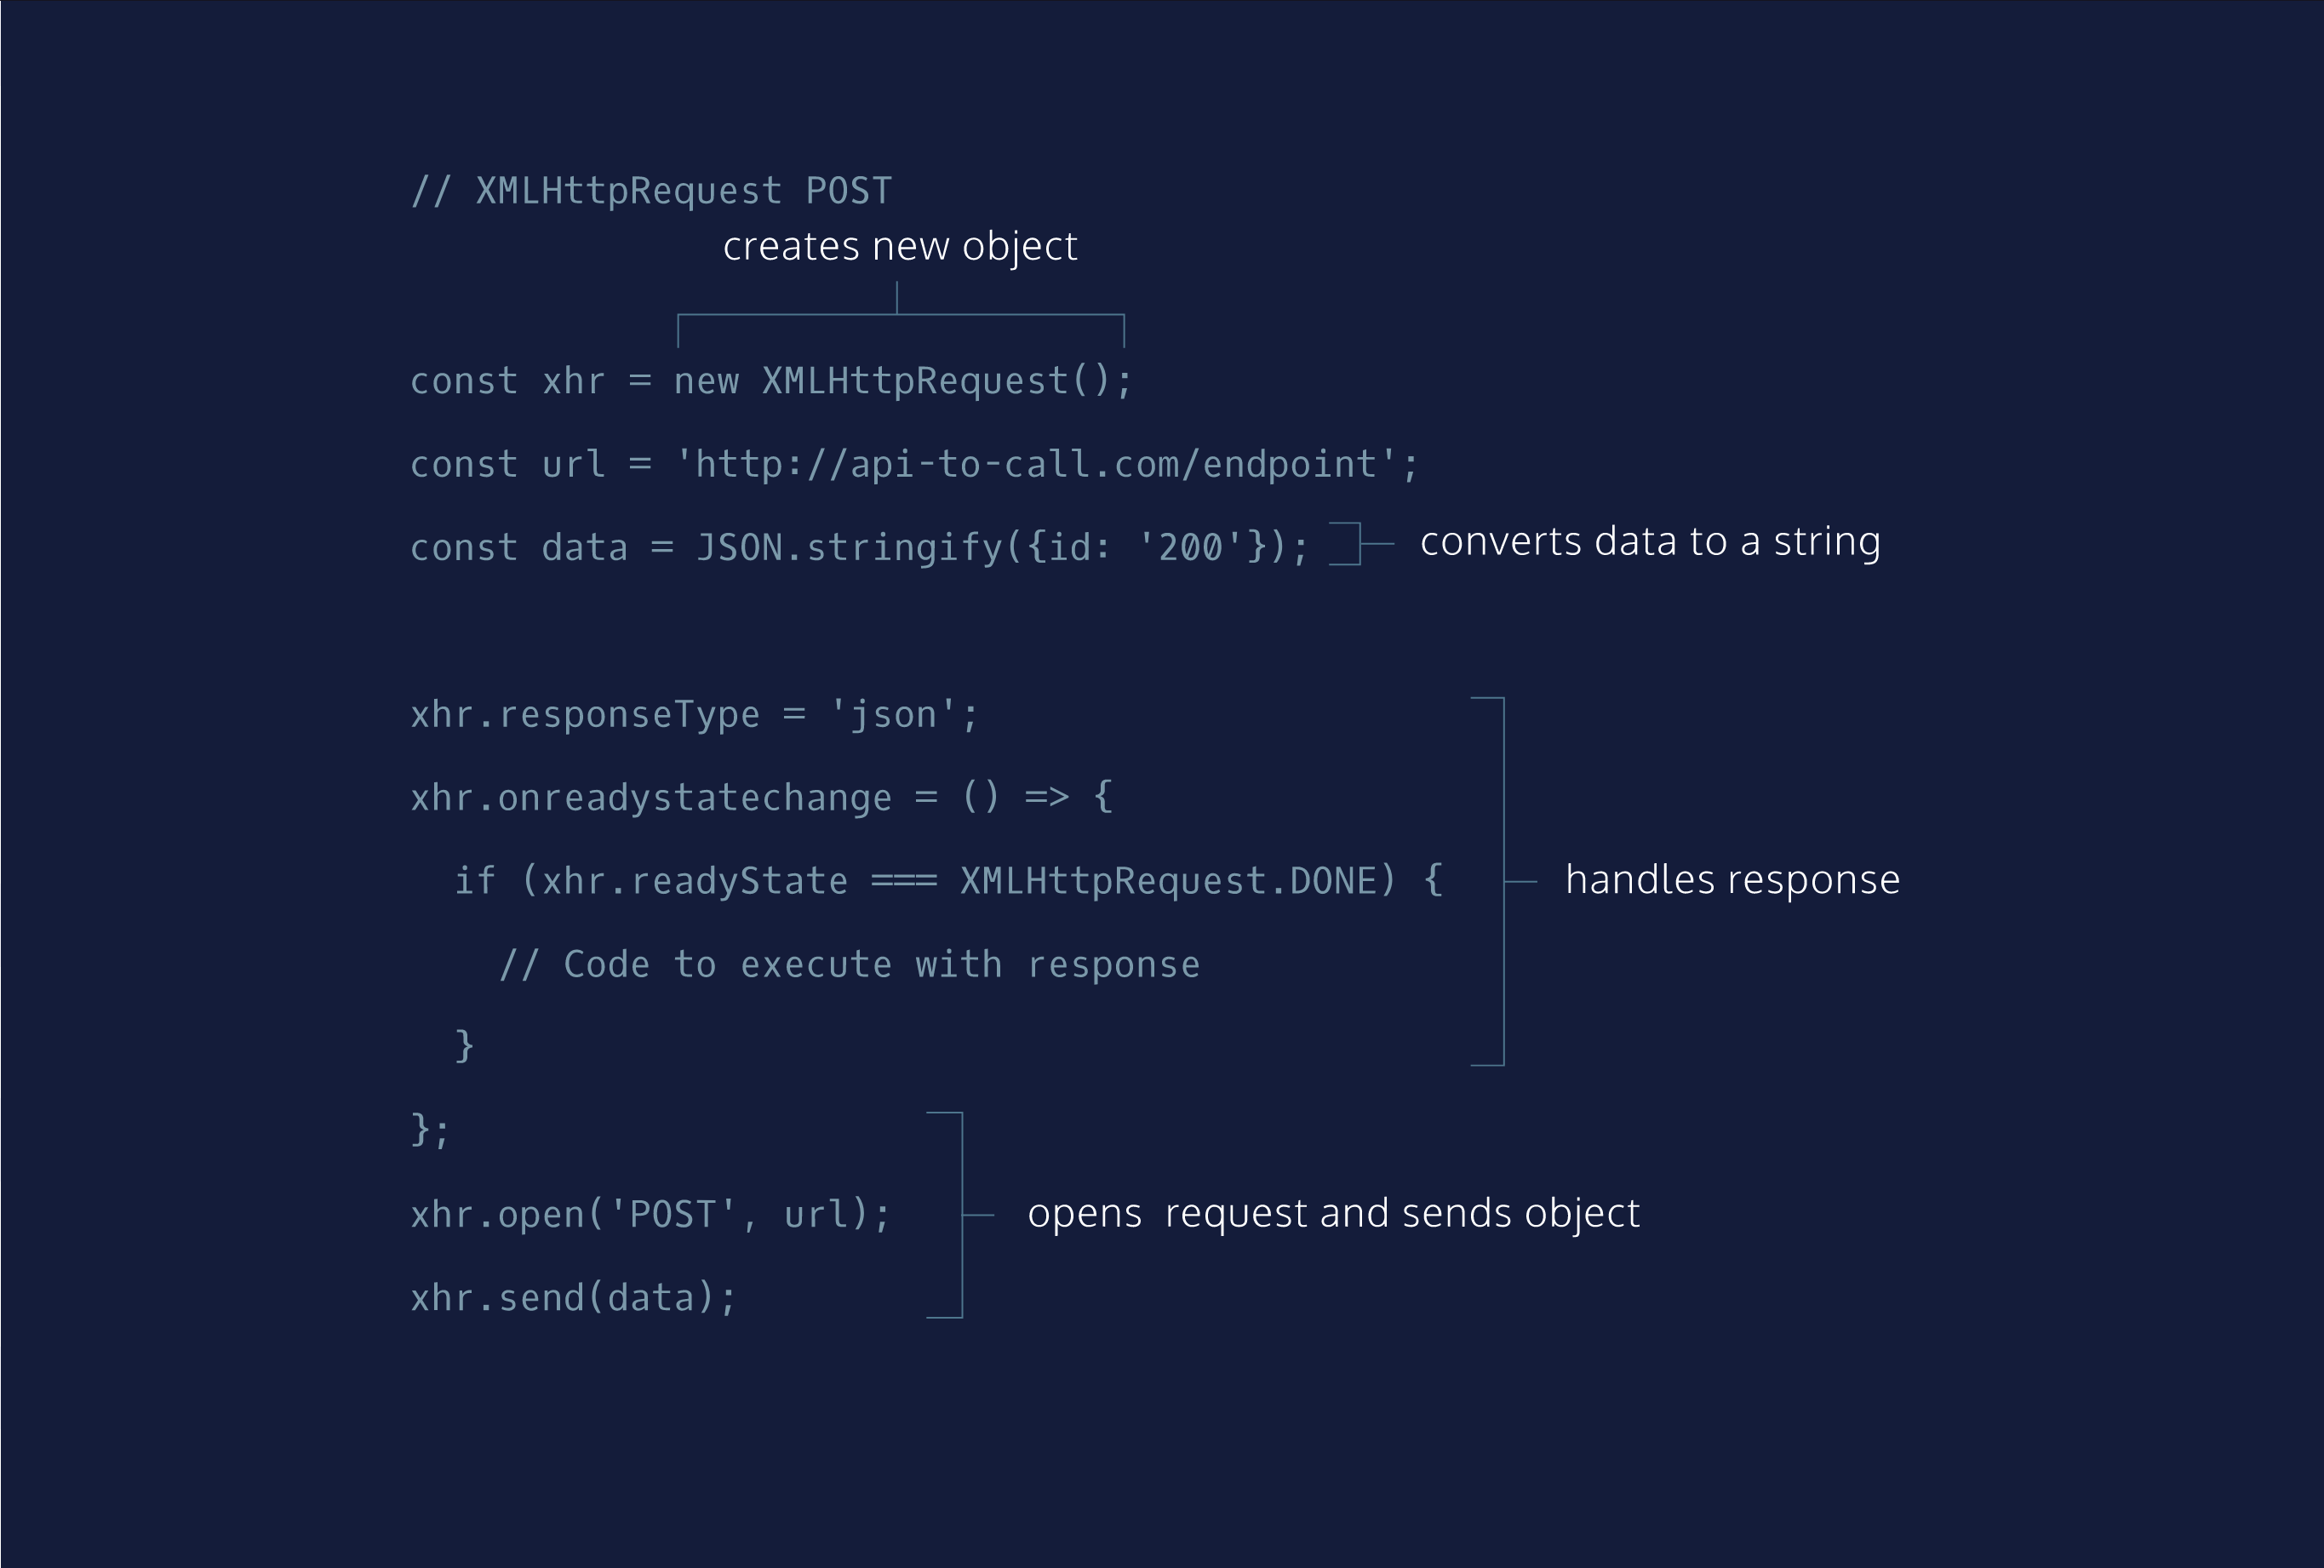
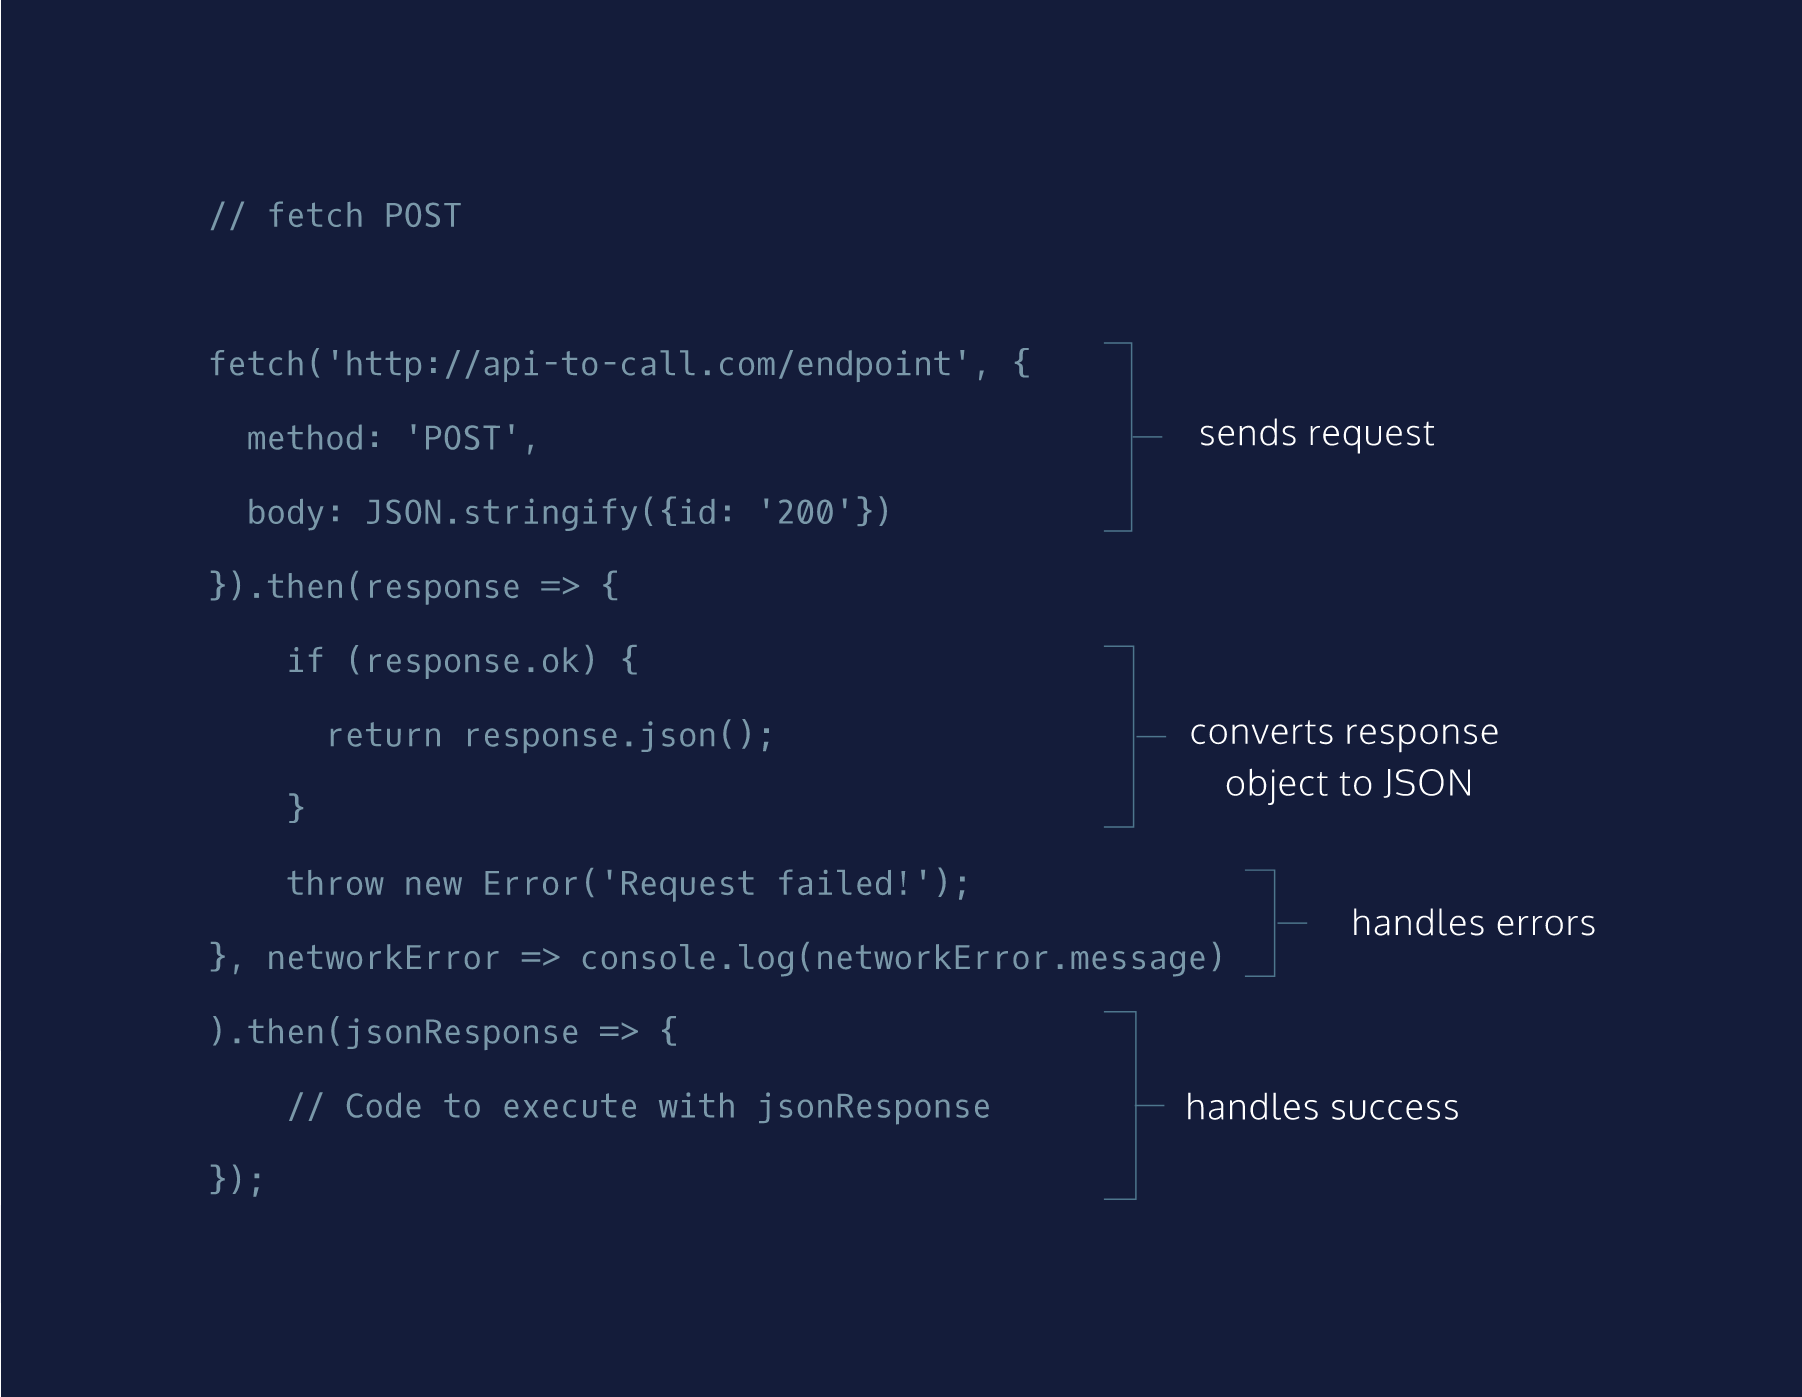
The major difference between a GET request and POST request is that a POST request requires additional information to be sent through the request. This additional information is sent in the body of the post request.
Introduction to Requests with ES6
To make asynchronous event handling easier, promises were introduced in JavaScript in ES6:
Mozilla Development Network: PromisesA promise is an object that handles asynchronous data. A promuse has three states.
- pending: when a promise is created or waiting for data.
- fulfilled: the asynchronous operation was handled successfully.
- rejected: the asynchronous operation was unsuccessful.
fetch() GET Requests I
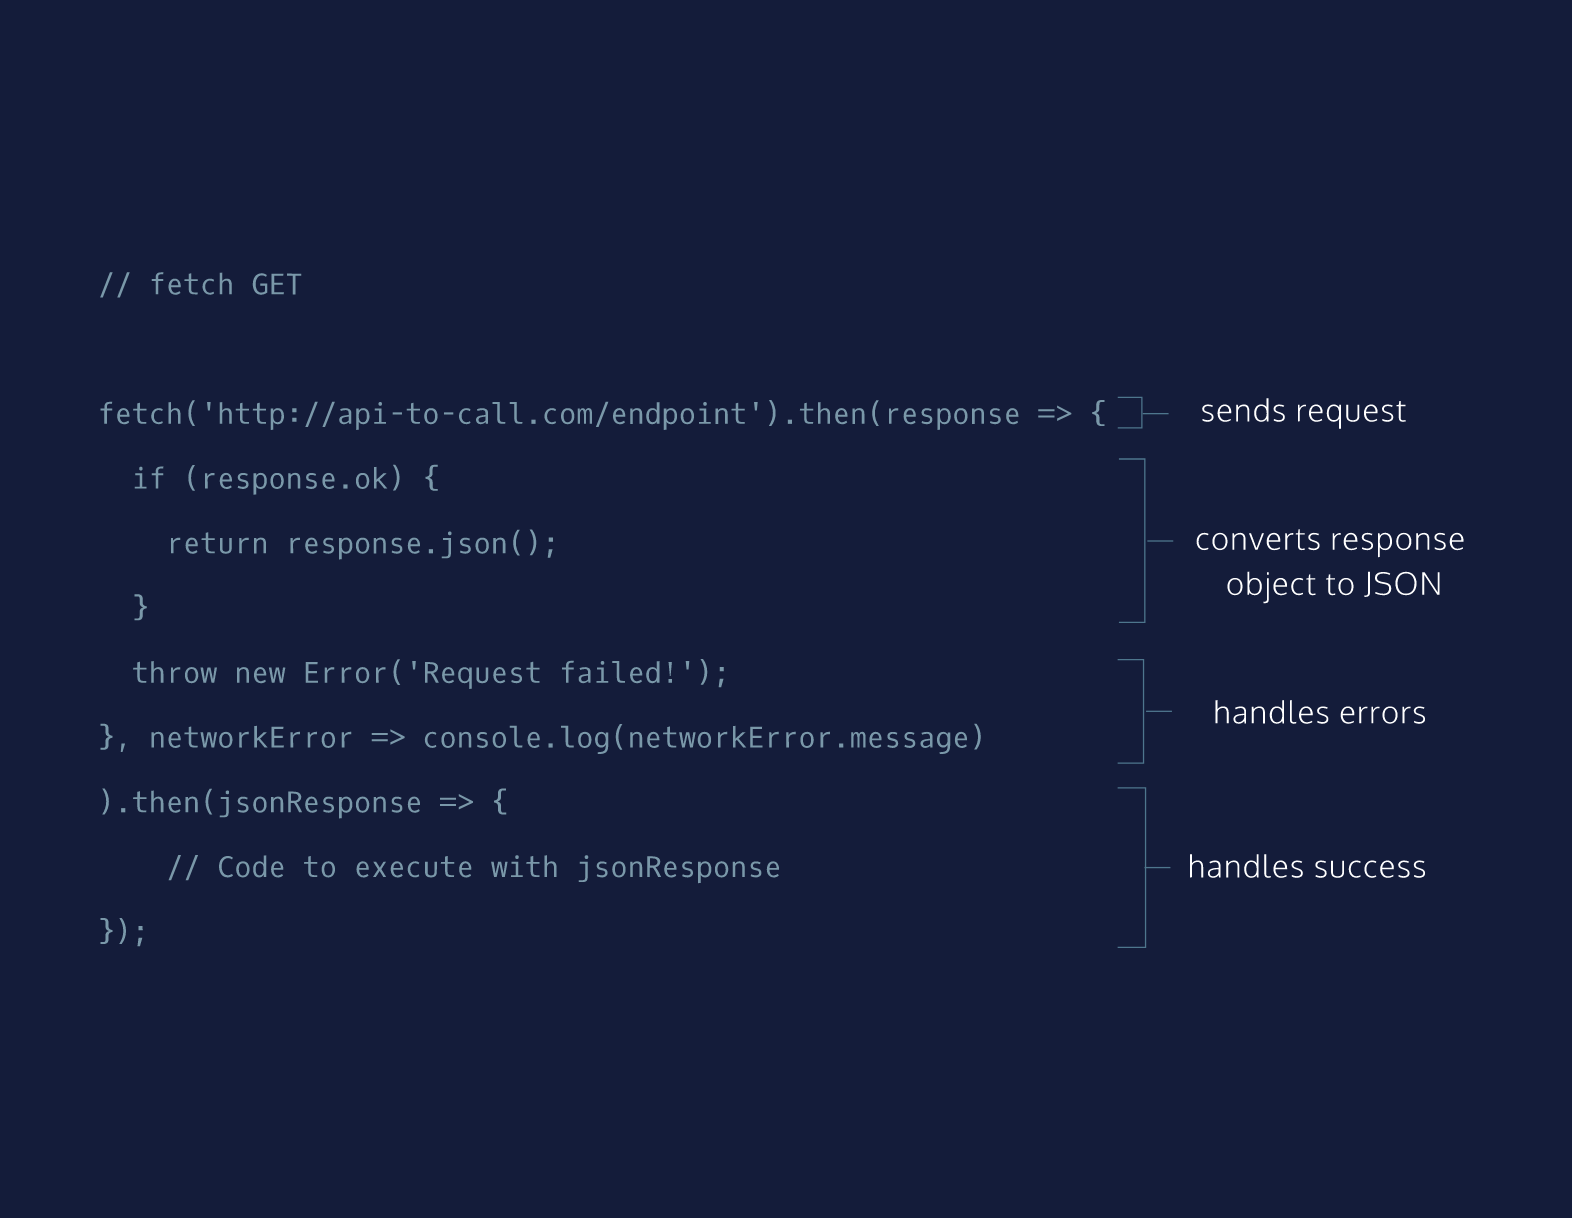
The first type of requests we're going to tackle are GET requests using fetch()
MDN: Fetch APIThe fetch() function:
- Creates a request object that contains relevant information that an API needs.
- Sends that request object to the API endpoint provided.
- Returns a promise that ultimately resolves to a response object, which contains the status of the promise with information the API sent back.
fetch() POST Requests I
fetch() GET Requests I
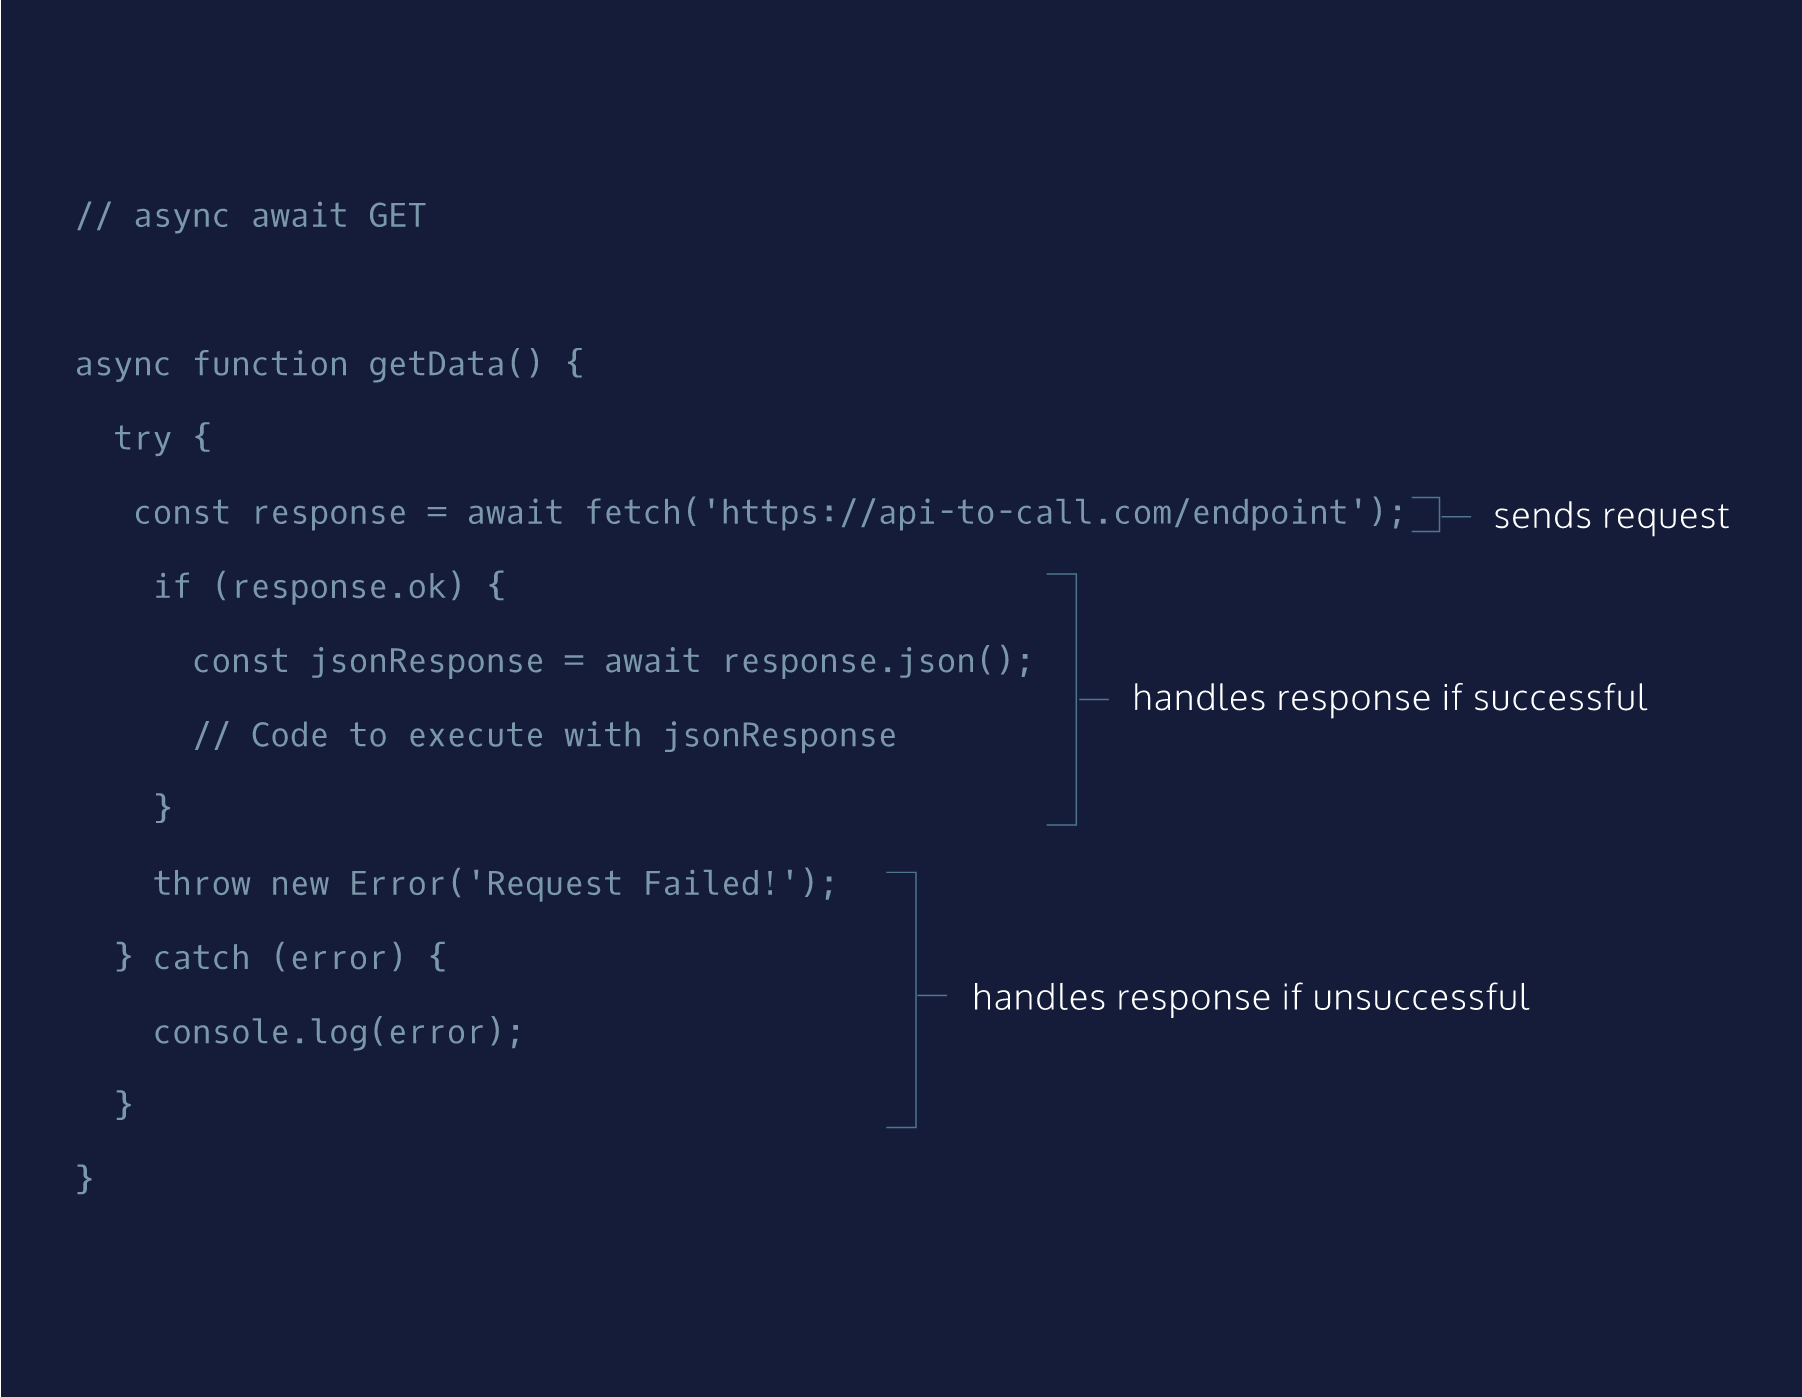
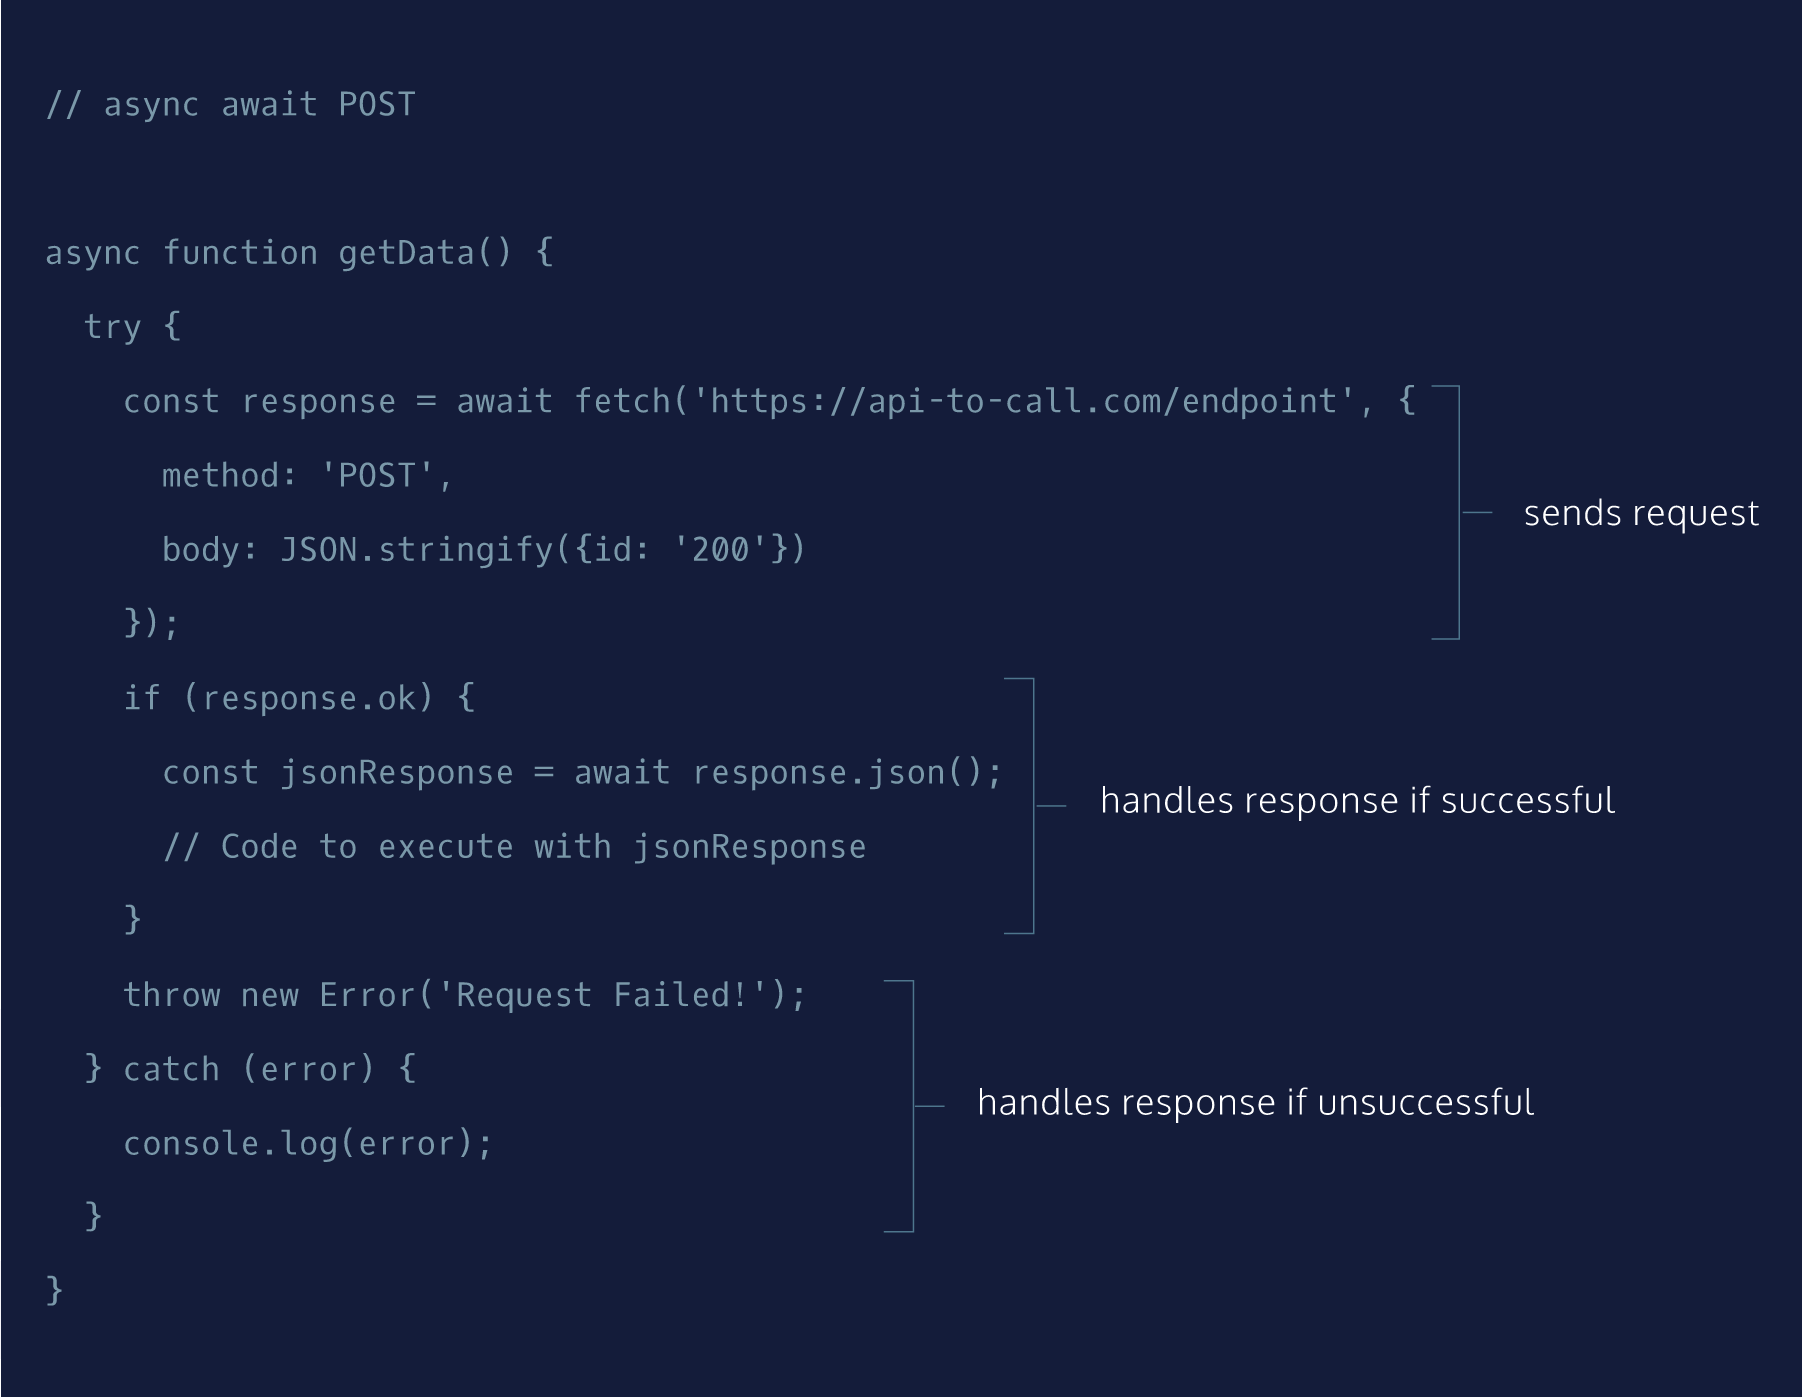
Promises and make it simpler using functionality introduced in ES8: async and await. The structure for this request will also be slightly different. Notice the new keywords async and await, as well as the try and catch statements.
async() POST Requests I
